May 2012
Beginner
88 pages
2h 4m
English
We are now ready to test our little web server, so connect the modules according to Figure 4-4 and program the Mainboard with the HelloWebServer program. You can also plug an Ethernet cable between the Ethernet module and your modem/switch. Don’t forget to also attach the DP Power module to connector 1.
After a short pause, the LED should turn green. Success!
Sometimes you have to unplug and the plug the Ethernet cable back in to make Gadgeteer aware of the connection. If this does not work and you get error messages when you deploy, then you might have an old version of the Gadgeteer Firmware and/or the SDK, so follow the installation and firmware update procedure described in Installation.
We do, however, have one little problem to overcome. Since the IP address is allocated automatically, we don’t know what we need to type into our browser.
To discover this, we need to look at the output window of Visual Studio, as shown in Figure 4-6. This window is only visible when you are in the debugger. If it is not showing, then you may need to make it visible by dragging the bottom partition of the screen—where the Error List usually resides—up a little.
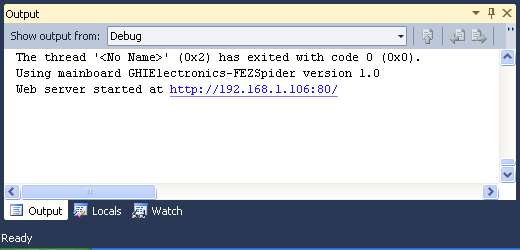
Figure 4-6. IP Address in the Output Window
You can see the following line in the output:
Web server started at http://192.168.1.106:80/
This tells us that the sever is up and running and listening for requests on port 80 (the :80 part). ...
Read now
Unlock full access


