Relive the 16-bit wars all over again on your home computer.
Some of us might find it hard to believe that the three great 16-bit systems— the venerable Super Nintendo, the epochal Sega Genesis, and the hardcore favorite TurboGrafx-16—actually fall into the realm of retro gaming. For those of you still in denial, consider this: children born when the SNES was released are entering high school this year.
I’ll pause for a moment so we can all weep for our lost, fleeting youth.
Better now? Hard as it is to process, the great 16-bitters, hardware from an age when the number of bits your system’s CPU could process was the end-all-be-all of fanboy arguments, are now old relics. But there’s an upside to all this—whereas 16-bit emulation was merely a gleam in a hacker’s eye a decade ago, it’s now routine. High-quality emulators exist for the SNES, Genesis, and other 16-bit systems, and in this hack I’ll cover the best of them.
Tip
You can find public domain ROM files for each of the systems covered here at sites like PD Roms (http://www.pdroms.de). To find TurboGrafx games, be sure to check under the PC Engine heading (the name of the system in Japan).
It took quite a while before a SNES emulator was released that could emulate all of the machine’s various hardware modes and add-on functions, like the Mode 7 that let the system scale and rotate sprites in hardware, or the Super FX chip that allowed for rudimentary 3D games like Star Fox. Two major programs have competed with each other for years: ZSNES (http://www.zsnes.com) and Snes9X (http://www.snes9x.com).
Since ZSNES seems to be the most popular and most fully-featured emulator, I’ll go into further detail on it here. To download it, click on the Files link on the web page, then click the topmost link that reads “Binary” in the Windows column. As of this writing, the latest version is 1.42. You’ll note that there are also DOS and Linux [Hack #43] versions available from the same page.
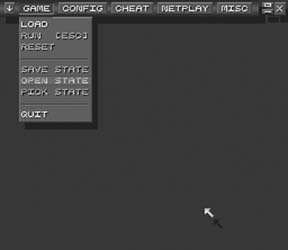
You’ll have to choose a mirror site from which to download. Just select the site that’s closest to you geographically, and if for some reason that link doesn’t work, try another. Unzip the files into a new directory on your PC, then run the zsnesw.exe file to start things up. After you run it, you might see a black square appear in the middle of your display, and you won’t be able to click anything or even move the cursor around. If this happens to you, just hit Alt+Enter to force ZSNES into fullscreen mode, and within a few seconds you should see something like Figure 4-24.
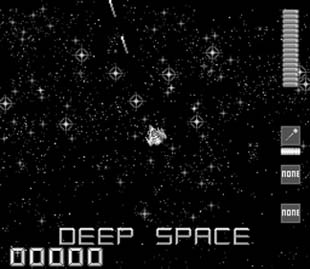
Helpfully, the Game menu will drop down automatically for you. Go ahead and click Load to open any ROM files you’ve downloaded. For convenience, you can save ROMs in zipped format; ZSNES will automatically recognize and extract them when you choose Load. For extra convenience, save your games to the same directory where you put the ZSNES program; otherwise you’ll have to use the (slightly confusing) menu to navigate to the directory you put them in. Figure 4-25 shows ZNES running a public domain ROM.
When you load a ROM it will run automatically and the menu will disappear; to get it back, press Esc at any time. The game will pause automatically while you have the menu up. If you’re a little confused as to the keyboard layout—and why wouldn’t you be? The SNES had eight buttons on its controller—click the Config menu and then select Input #1.
Notice that ZSNES uses the same settings for both keyboard and joystick— that is, if you want to use a joystick, you have to override the keyboard button settings. If this is what you desire (or if you just want to choose a different keyboard arrangement), click the Set Keys button. You’ll be prompted to enter the mapping for each button in turn—at the prompts, hit the appropriate keyboard key or joystick button. If you’re using a USB joystick, ZSNES should recognize it, but only if it was plugged in before you started the program.
You’ll notice that the ZSNES GUI is rather old school. You can’t change that, but you can mess around with the colors and other graphics to tune it to your own sense of aesthetics. Click Misc → Gui Opns to mess around with the look of the GUI. Try adding the “Burning Effect” or “Snow Effect” and see what happens to the formerly drab menu screen!
Part of the beauty of emulators is that we need no longer engage in the petty “system wars” that tore us apart in middle school. Everyone can have a virtual copy of every system, so let’s not fight about which one is the best.[3] Although there are about twenty different Sega Genesis emulators listed on emulation portal Zophar’s Domain (http://www.zophar.net/genesis.html), there are two clear leaders: Gens (http://www.gens.ws) and Kega (http://kega.eidolons-inn.net/).
Both support not only the Genesis, but also the 32X and Sega CD add-ons. If you use them to play Sega CD games, you can use your original CDs— which is probably preferable to setting up that whole clunky machine again if you want to get in a quick game of Final Fight CD!
Also, both emulators have upgraded and expanded versions available that add in Sega Master System and Game Gear emulation. They’re called Gens Plus and Kega Fusion, respectively. Of course, the emulation for these systems is still in the beta stage, and there are already better SMS/GG emulators out there [Hack #48] .
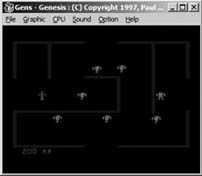
As it turns out, the GUIs for Gens and Kega are not that different. For simplicity’s sake, I’ll assume you’re going to try out the standard version of Gens, but many of these tips will suffice for Kega and Kega Fusion. Note that Genesis ROMs will run in the emulator as-is: just download the zipped file to whatever directory is most convenient for you, then after you download and run Gens, click File → Load ROM to open it up. Figure 4-26 shows Gens in action.
If you want to configure your button setup, click Option, then Joypads. Clicking the topmost drop-down box that reads “3 Buttons” by default will let you select what Genesis pad you want to emulate—the classic three-button or the awesome six-button. If you want to play a four-player game, you must emulate the Team Player four-player adapter by connecting it to one of the virtual controller ports—to do so, click the drop-down box that says “pad” by default.
One other important menu you’ll want to be able to use, especially if you want to play Sega CD or 32X games, is the Bios/Misc Files configuration under the Option menu. Here, you can show Gens where the BIOS files for the Sega CD and 32X are located on your computer. These are required to run the games, but aren’t distributed with the emulators themselves due to copyright issues. As of this writing, you can find them at the Kega homepage. Make sure to unzip them when you save them to your computer—Gens and Kega will both recognize zipped ROMs, but not zipped BIOS files.
If you didn’t have a SNES or a Genesis back in the day, perhaps you were one of the hardcore (or very unlucky) few who owned a TurboGrafx-16. (Hey, I’m not saying it didn’t have its share of quality titles, but you might have missed out on a lot.) Much like the Sega Genesis, the TurboGrafx-16 also had a CD-ROM add-on. So, although there are many different emulators that will run ROM files from the standard HuCard game chips that shipped with the system, if you want full functionality from your emulator you’ll want one of the three that will run CD games.
Those emulators are YAME (http://www.zophar.net/yame.html), Hu-Go (http://www.zeograd.com/), and Magic Engine (http://www.magicengine.com/ ). Magic Engine is considered to be the best PC Engine emulator out there, but the quality comes at a price. Literally. You can download a preview version of Magic Engine for free, but the full software must be purchased from the official web page for $19. The demo version will play all games, but automatically shuts itself off after five minutes. You could, of course, abuse the save and restore functions if you don’t mind shutting the program down every four minutes and fifty-nine seconds. If you do mind, then you might check out Hu-Go or YAME—the latter is said to be more stable, but is a Japanese-language program.
And finally, there’s that overpriced, overpowered wonder, the Neo Geo. Since the infamous (but not especially popular) console was based on arcade hardware, the most convenient way to emulate Neo Geo games would be through MAME [Hack #20] . If you’re only interested in the Neo Geo, and not other arcade games, then you might check out the sampling of Neo Geo-specific emulators at Zophar’s Domain (http://www.zophar.net/neo-geo.html). Either way, you’ll be able to find homebrew Neo Geo games [Hack #24] .
Get Retro Gaming Hacks now with the O’Reilly learning platform.
O’Reilly members experience books, live events, courses curated by job role, and more from O’Reilly and nearly 200 top publishers.


