The Mac OS X Finder is primarily used for managing files stored on your computer’s hard and floppy disks, and over the network. This section discusses many of the Finder’s operations and menu commands for managing files and folders.
Log into your account on a computer running Mac OS X. Make sure that the Finder is the active application and that only one of its windows is open.
Open your Home folder (directory) by selecting (with a single-click) the Home icon toward the center of the toolbar in the Finder window.
Switch to icon view in the Finder.
Create a new folder in your Home folder by choosing File → New Folder from the menu bar. The new folder will be named “untitled folder”.
Make sure the text “untitled folder” is selected (in your highlight color). If it isn’t, double-click the text “untitled folder” to select it.
Rename the new folder
stuffby entering “stuff” on the keyboard.Make your
stufffolder easily accessible by dragging its icon from your Finder view pane and dropping it on your Finder toolbar (widen the Finder window if necessary). Whenever you need to access thestufffolder, all you need to do is click its icon in the Finder toolbar.Switch to column view in the Finder.
Open the
/System/Library/Soundsfolder in the Finder window by:Clicking the Computer icon in the Finder’s toolbar
Clicking the Macintosh HD icon (or wherever your Mac OS X operating system is located)
Clicking the
Systemfolder, then theLibraryfolder, and finally theSoundsfolder (you’ll probably have to scroll down to see it)
Traversing through the filesystem this way is easiest in column-view mode. Icon-view mode requires double-clicks, and the folders are more difficult to find. However, there’s an even easier way to get to the
Soundsfolder, as we’ll see next.Choose Finder’s Go → Go to Folder menu command, and note that a sheet drops down from the active Finder window (see Figure 1-37).
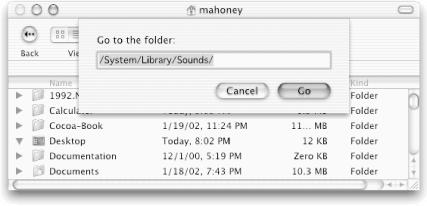
Type in “/Sys” in the Go to Folder sheet, and the Finder will complete the folder name to “System” for you. Hit the Tab key to accept the completion.
Finish typing the path
/System/Library/Sounds(with tabs), as shown in Figure 1-37, then click the Go button. This is a quick way to access a folder for which you know the path but that you don’t have in your toolbar.
The case-sensitivity of filenames depends on the kind of disk volume on which your file resides. Most Mac OS X computer disks are formatted with Apple’s HFS+ filesystem. With HFS+, the case of filenames is preserved but ignored. This means that you cannot have files named “apple” and “Apple” in the same folder. On the other hand, if your disks are formatted with the Unix filesystem, filenames are case-sensitive — an uppercase “A” is a different character from a lowercase “a” — so files named “apple” and “Apple” can appear in the same folder. This can be confusing!
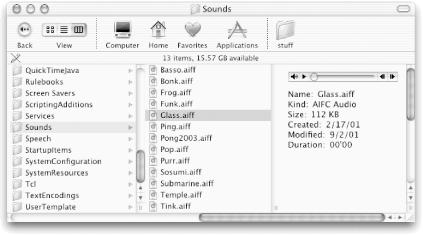
Select the
Glass.aifffile by clicking the filenameGlass.aiffin theSoundsfolder in the Finder.Click the arrow in the right column to play the “glass” sound (see Figure 1-38).
Switch to icon view in the Finder.
Press down on the
Glass.aifficon and drag it so it’s on top of thestufffolder icon in your Finder toolbar. Don’t release the mouse button yet.Note that the cursor changes to the standard arrow-with-plus-sign cursor, indicating that a copy operation is about to take place.
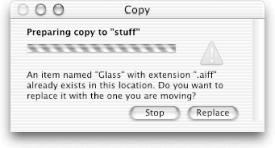
Now drop the
Glass.aifficon on top of thestufffolder icon (i.e., release the mouse button). The file will be copied into thestufffolder.Again drag the
Glass.aifficon from the icon path and drop it on top of thestufffolder icon in the Finder toolbar. A Finder alert labeled “Copy” pops up to warn you that the fileGlass.aiffalready exists in yourstufffolder, as shown in Figure 1-39.
Stop the copy operation by clicking the Stop button on the Copy alert.
Double-click the
Glass.aifficon. The QuickTime Player application in the/Applicationsfolder will automatically launch (because the player is associated with .aifffiles).Play the sound by clicking the big circular Play button in the center of the application.
Quit the active QuickTime Player by choosing QuickTime Player → Quit QuickTime Player. Note that the previously active application, the Finder, automatically becomes active.
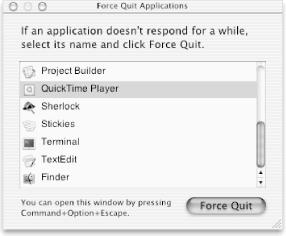
Discover which applications are running by selecting Force Quit from the Apple menu. The currently running applications will be listed in the Force Quit Applications utility window, as shown in Figure 1-40.
The Force Quit button provides a simple way to quit applications that are hung (unable to continue processing). If an application is hung, select it from the list of running applications in the Force Quit Applications window and then click the Force Quit button. Do not use this method to quit an application unless it is hung.
This feature of Mac OS X is made possible by the protected memory architecture provided by Darwin/Unix that allocates a unique memory space for each application. We recommend that you remember the key equivalent, Command-Option-Escape, that brings up the Force Quit Applications window without using the mouse (which might be temporarily out of service).
Click the red close button at the top left of the Force Quit Applications window.
Still in icon view, open your Home folder again by clicking the Home icon in the Finder’s toolbar.
Create another new folder called
junkin your Home folder by typing Shift-Command-N (the key equivalent of choosing the File → New Folder menu command) and renaming the untitled folder. (To type Shift-Command-N, hold down one Shift and one Command key simultaneously while typing the N key.)Make your
junkfolder easily accessible by dragging its icon from your icon view pane and dropping it in your Finder toolbar.Open the
stufffolder by clicking its icon on your Finder toolbar.
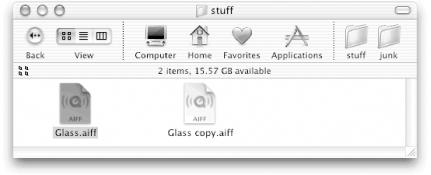
Select the file
Glass.aiffin your browser (use a single-click).Make a copy of the
Glass.aifffile in thestufffolder by choosing File → Duplicate from the Finder’s menu (or typing Command-D).A new file named
Glasscopy.aiff, which is a copy of theGlass.aifffile, will appear in yourstufffolder. Your Finder window should look like the one in Figure 1-41.Without releasing the mouse button, drag the
Glass.aifficon so it’s on top of thejunkfolder icon on your Finder toolbar.The plus-sign cursor does not appear this time; instead, the cursor remains an arrow. The arrow indicates that the file
Glass.aiffwill be moved to thejunkfolder, not copied.Release the mouse button and check the contents of the
stuffandjunkfolders. Note that theGlass.aifffile appears only in thejunkfolder.If you are the owner of both folders and they reside on the same physical disk, the default behavior for drag-and-drop operations is to move files, not copy them. This behavior also applies when you drag and drop multiple files or folders.
Open the
junkfolder by clicking its icon in the Finder toolbar.Select the
Glass.aifffile in your browser.Without releasing the mouse button, drag the
Glass.aifficon and let it hover over each of the icons (Computer, Home, etc.) in your Finder toolbar.Note that some of the icons in the toolbar highlight, indicating that they will accept the
Glass.aifffile. The Computer icon will not accept it (unless you are logged in as superuser). Note that the cursor changes to the arrow-plus-link cursor over the Favorites icon (because Favorites stores only aliases to files, not the files themselves).Keeping the mouse button pressed, drag the
Glass.aifficon on top of thestufffolder icon on your Finder toolbar and press the Option key. Note that the plus-sign cursor appears. Release the mouse button while pressing the Option key, and note that theGlass.aifffile is copied into thestufffolder.You have forced a copy by using the Option key.
Type Command-N twice to make two more Finder windows appear.
Holding down a Command key, press on the title bar of one of the windows that is in the background and drag the window to a new location. Release the mouse and Command key.
Notice that you can move this window around the desktop without bringing it to the front. If the window belonged to another application, the Command key would allow you to move the window without activating that application. This technique can be useful for clearing your work area or finding windows.
Close the two new Finder windows.
Select the
stufffolder icon in your Finder toolbar to open that folder.Select the
Glass.aifffile.Choose File → Show Info (or type Command-I) to display the
Glass.aiffInfo dialog, as shown on the left side of Figure 1-42).
The General Information pane displays general information about the file or folder that is currently selected in the Finder. For a file, this includes the kind of file that is selected and its size. For folders, the Info dialog displays the total size of all of the items in that folder. If you click the Locked switch for a file, no changes to the file will be permitted (although the file may still be moved to another location). If you click the “Stationery Pad” checkbox, when the file is opened, a new, untitled copy of the original is opened. This is useful for storing file templates.
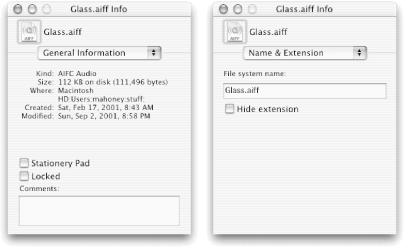
Choose Name & Extension from the pop-up menu in the Info dialog (see the right side of Figure 1-42). This pane shows the true name of the file as it is stored in the filesystem (later try looking at an application file, and you’ll see the
.appextension). You can also control whether the extension for this file will be displayed (e.g.,Glass.aiffwill become simplyGlass).Choose “Open with application” from the pop-up menu in the
Glass.aiffInfo dialog (see the left side of Figure 1-43). This Info dialog pane shows which applications may be associated with theGlass.aiffsound file.
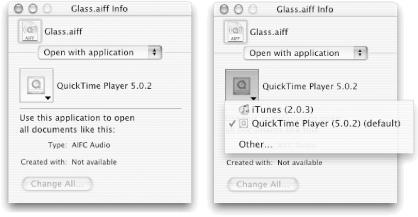
Press the bevel button with the QuickTime icon on it to see a pop-up menu (see the screen shot on the right of Figure 1-43).
Drag to iTunes and release the mouse button.
Double-click
Glass.aiffin the Finder, and iTunes will open and play the “glass” sound.Choose iTunes → Quit iTunes.
Note that AIFF files can be opened with either QuickTime Player or iTunes. Mac OS X applications contain information about what kinds of files they can open; the Finder reads this information and displays the results in the Info dialog’s “Open with application” pane.
Press the bevel button in the Finder’s Info dialog again and drag to QuickTime Player. iTunes is not the best application to associate with simple sounds.
Choose Preview from the pop-up menu in the
Glass.aiffInfo dialog (see the left side of Figure 1-44). The Preview pane allows you to see the contents of some files without actually launching an application program. The Finder knows how to preview sound, graphics, and some plain-text files, but not many others. In this case, you can preview an AIFF sound.
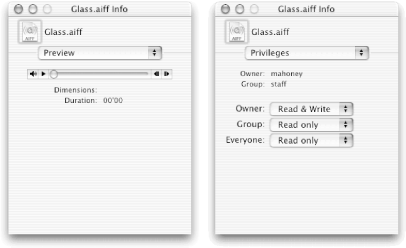
Finally, choose Privileges from the pop-up menu in the
Glass.aiffInfo dialog (see the right side of Figure 1-44).The Privileges pane allows you to control the security of the file. Each file has a specific owner and a group to which it belongs (these are Unix concepts). If you are the owner of the file, you can change its privileges.
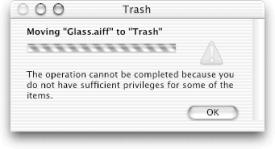
Change the Owner privilege from “Read & Write” to “Read only” via the Owner pop-up menu. The file
Glass.aiffwill then be read-only for you, the owner. Consequently, you won’t be able to delete it, but let’s try anyway.Drag the
Glass.aifffile icon from yourstufffolder and drop it on the Trash icon in the Dock. You’ll get the alert shown in Figure 1-45. Click OK.
Change the Owner privilege of
Glass.aifffrom “Read only” back to “Read & Write” via the Owner pop-up menu (i.e., reverse Step 52).Still in icon view in the Finder, click the Home icon and then select the
stufffolder.Hold down the Command key and select the
junkfolder. Note that both folders are now selected.Drag either of the two selected folders to the Trash, and both will be moved. Notice that the folders are still in your Finder toolbar (we wish that Apple would remove icons from the toolbar when they are trashed).
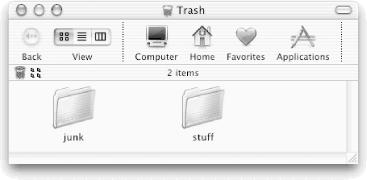
Drag the
stuffandjunkfolders off the toolbar into the desktop.Double-click on the Trash icon to display the contents of the Trash window, as shown in Figure 1-46. Note that the Trash window is a special type of Finder window that does not allow viewing of parts of the filesystem other than the
Trashfolder.
Choose the Finder → Empty Trash menu command. You will be prompted to see if you are sure that you wish to remove the folders, as shown in Figure 1-47.
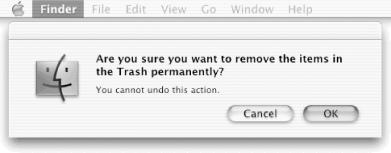
Click OK.
Get Building Cocoa Applications: A Step by Step Guide now with the O’Reilly learning platform.
O’Reilly members experience books, live events, courses curated by job role, and more from O’Reilly and nearly 200 top publishers.

