October 2009
Beginner
208 pages
4h 41m
English
Netbooks are all the rage nowadays, with manufacturers rolling out new netbooks at an incredible rate. Windows 7 is a popular choice for installing on netbooks, as it is designed and optimized for low-powered computers like netbooks. However, one limitation of netbooks is that they do not have DVD drives, and this makes installing a new OS on them a bit challenging. Fear not: armed with a computer running Vista or Windows 7 and a USB hard disk or thumb drive, you can install Windows 7 on a netbook easily. Here’s how.
You can install Windows 7 using a USB hard drive. The following steps show you how to prepare your existing USB hard drive for installing Windows 7:
Connect your USB hard disk to your computer.
Launch the Disk Management application available in Windows.
In Windows Vista, the Disk Management tool is found under Control Panel→Administrative Tools→Computer Management. In Windows 7, type “disk management” in the Start menu to launch it.
Locate the USB hard drive and right-click it (see Figure 8-33). Select Shrink Volume....
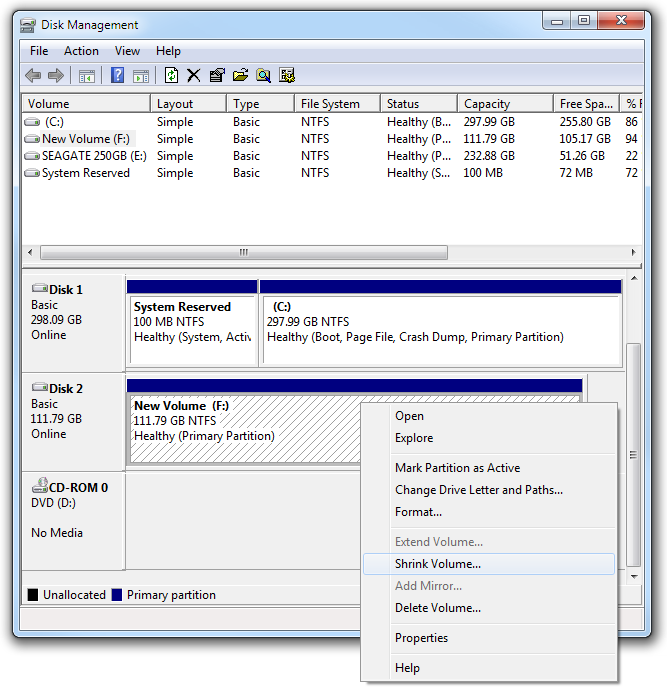
Figure 8-33. Shrinking an existing hard disk
You will be asked the size in MB to shrink. Enter an amount greater than 3,000 (3 GB). For my example, I used 15,000 (15 GB; see Figure 8-34). Click Shrink.
Figure 8-34. Specifying the amount to shrink
When the shrinking is done, right-click the new ...
Read now
Unlock full access


 O’Reilly covers everything we've got, with content to help us build a world-class technology community, upgrade the capabilities and competencies of our teams, and improve overall team performance as well as their engagement.I wanted to learn C and C++, but it didn't click for me until I picked up an O'Reilly book. When I went on the O’Reilly platform, I was astonished to find all the books there, plus live events and sandboxes so you could play around with the technology.I’ve been on the O’Reilly platform for more than eight years. I use a couple of learning platforms, but I'm on O'Reilly more than anybody else. When you're there, you start learning. I'm never disappointed.I'm always learning. So when I got on to O'Reilly, I was like a kid in a candy store. There are playlists. There are answers. There's on-demand training. It's worth its weight in gold, in terms of what it allows me to do.