Flash gives you a couple of options that help you organize your layers while you're working. The Outline view removes the fill from drawings, showing only a wireframe outline. Outline view is helpful when you want to simplify the artwork on a cluttered screen. Layer folders help you organize your layers into a hierarchy, which is helpful when you're working with dozens of layers. The ability to put several layers in a single folder makes it easier to lock and hide related materials.
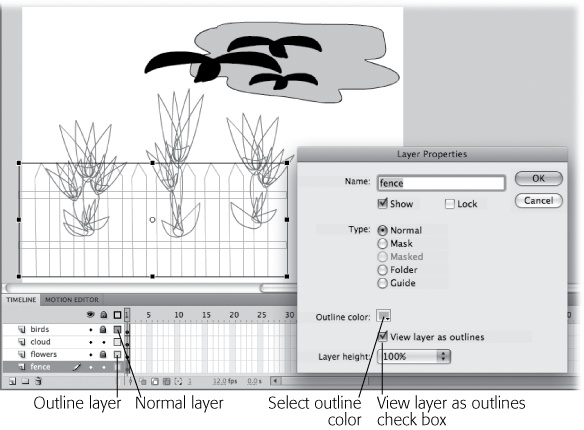
Flash lets you display the contents of your layers in outline form. Instead of seeing solid pictures on the stage, you see wireframe images, as in Figure 4-21. Looking at your layer content in outline form is useful in a variety of situations—for example, when you want to align the content of one layer with respect to the content of another.
Figure 4-21. Depending on the visual effect you're going for, you might want to align the centers of your flowers with the crosspieces of your fence. But when you look at the content normally, it's hard to see the alignment, because both your flowers and your fence are opaque. Here, Flash displays the flowers and fence layers in outline form so you can concentrate on shape and placement without being distracted by extraneous details.
To display the content of all your layers as outlines, click the Show All Layers As Outlines icon (next to the padlock). Clicking it again displays your layers normally.
To show a single layer's content in outline form, click the filled square, as shown in Figure 4-20. When you do, Flash changes the filled square to a hollow square (the Outline icon) and displays your layer content in outline form on the stage. To return your layer to normal, click the square again.
To outline the contents of every layer except one, Alt-click (Option-click) the outline icon for that layer.
Tip
You can change the color Flash uses to sketch your outlined content. For example, you can change the color from light to dark so that you can more easily see the outline against a light background or so that there's more contrast between two overlapping outlines. To change the outline color for a layer, first select the layer, and then select Modify→Timeline→Layer Properties. From the Layer Properties dialog box (Figure 4-21) that appears, click the Outline Color swatch and then select a color from the color picker that appears.
When your animation has only a handful of layers, organization isn't such a big deal. But if you find yourself creating 10, 20, or even more layers, you'll want to use layer folders to keep your layers tidy (and yourself from going nuts).
A layer folder is simply a folder you can add to the Layers window. Layer folders aren't associated with frames; you can't place images directly into them. (If you try, you see the error message shown in Figure 4-22.)
Figure 4-22. If you try to draw on the stage when you've selected a folder instead of a layer, Flash lets you know in no uncertain terms. (An interpolated frame is a tweened frame; as you learned in Chapter 3, you can't place images in a tweened frame, either.)
Instead, layer folders act as containers to organize your layers. For example, you might want to put all the layers pertaining to a certain drawing (like a logo or a character) into a single layer folder and name the folder logo or Ralph. That way you don't have to scroll through a bunch of layers to find the one image you're looking for.
Note
As you might expect, showing, hiding, locking, unlocking, and outlining a layer folder affects every layer inside that folder.
Each folder you add takes up a line in the timeline, and eventually there's not enough room to display all the layers and folders in the panel. You can use the scroll bar on the right side of the timeline find your layers, or you can increase the height of the timeline panel by dragging the panel's top edge.
To create a layer folder:
Click the name of a layer to select it.
When you create a folder, it appears above the selected layer; but you'll be able to drag your folder and its contents to a new location.
Click the Insert Layer Folder icon. (If you prefer, you can choose Insert→Timeline→Layer Folder or right-click the layer, and then, from the shortcut menu that appears, choose Insert Folder.)
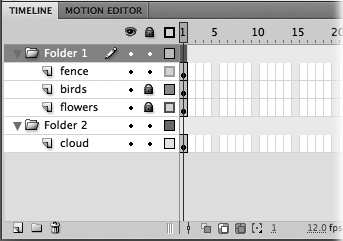
Flash creates a new layer folder named Folder 1, as shown in Figure 4-23.
Drag layers onto the layer folder.
If the folder is already expanded, you see the layers appear beneath. If the folder is closed, then click the triangle button to view the layers inside.
Tip
You can place layer folders inside other layer folders, but don't go wild; the point is to organize your layers so that you can find them easily, not to see how few folders you can display in the Layers window.
Figure 4-23. Newly created layer folders appear expanded, like Folder 1 here (note the down arrow). Clicking the down arrow collapses the folder and changes the down arrow to a right arrow. When you drag layers into an open folder (or expand a collapsed folder), the layers appear beneath the folder. You rename a layer folder the same way you rename a layer: by double-clicking the existing name and then typing in one of your own. You can move layer folders around the same way you move layers around, too: by dragging.
To delete a layer folder, and all the layers and folders inside, right-click the layer folder, and then, from the shortcut menu that appears, select Delete Folder. Flash pops up a warning message informing you that you're about to delete not just the folder, but also everything in it. If that's what you want, then click Yes; otherwise, click No.
Get Flash CS5: The Missing Manual now with the O’Reilly learning platform.
O’Reilly members experience books, live events, courses curated by job role, and more from O’Reilly and nearly 200 top publishers.


