You’ve just read about how Spotlight works fresh out of the box. But you can tailor its behavior, both for security reasons and to fit it to the kinds of work you do.
Here are three ways to open the Spotlight preferences center:
In any case, you wind up face to face with the dialog box shown in Figure 3-9.
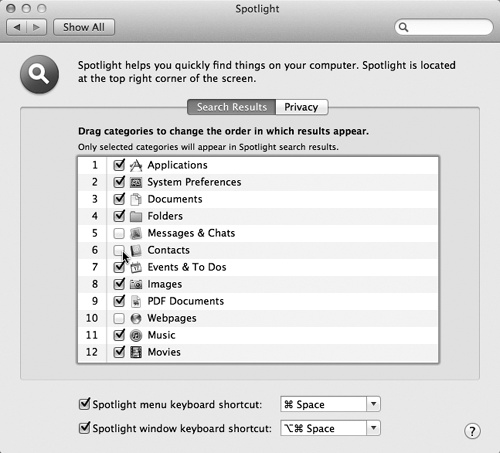
Figure 3-9. Here’s where you can specify what categories of icons you want Spotlight to search, which order you want them listed in the Spotlight menu, and what keystroke you want to use for highlighting the Spotlight Search box.
You can tweak Spotlight in three ways here, all very useful:
Turn off categories. The list of checkboxes identifies what Spotlight tracks. If you find that Spotlight uses up valuable menu space listing, say, Web bookmarks or fonts—stuff you don’t need to find very often—then turn off their checkboxes. Now the Spotlight menu’s 20 precious slots are allotted to icon types you care more about.
Prioritize the categories. This dialog box also lets you change the order of the category results; just drag a list item up or down to change where it appears in the Spotlight menu.
The factory setting is for Applications to appear first in the results. That makes a lot of sense if you use Spotlight as a quick program launcher (which is a great idea). But if you’re a party planner who spends all day on the phone, and the most important Spotlight function for you is its ability to look up someone in your Address Book, then drag Contacts to the top of the list. You’ll need fewer arrow-key presses once the results menu appears.
Change the keystroke. Ordinarily, pressing ⌘-space bar highlights the Spotlight Search box in your menu bar, and Option-⌘-space bar opens the Searching window. If these keystrokes clash with some other key assignment in your software, though, you can reassign them to almost any other keystroke you like.
Most people notice only the pop-up menu that lets you select one of your F-keys (the function keys at the top of your keyboard). But you can also click inside the white box that lists the keystroke and then press any key combination—Control-S, for example—to choose something different.
Apple assumes no responsibility for your choosing a keystroke that messes up some other function on your Mac. ⌘-S, for example, would not be a good choice.
On the other hand, if you choose a Spotlight keystroke that Mac OS X uses for some other function, a little yellow alert icon appears in the Spotlight pane. This icon is actually a button; clicking it brings you to the Keyboard & Mouse pane, where you can see exactly which keystroke is in dispute and change it.
Ordinarily, Spotlight looks for matches wherever it can, except in other people’s Home folders. (That is, you can’t search through other people’s stuff).
But even within your own Mac world, you can hide certain folders from Spotlight searches. Maybe you have privacy concerns—for example, you don’t want your spouse Spotlighting your stuff while you’re away from your desk. Maybe you just want to create more focused Spotlight searches, removing a lot of old, extraneous junk from its database.
Either way, the steps are simple. Open the Spotlight panel of System Preferences, as described previously. Click the Privacy tab. Figure 3-10 explains the remaining steps.
Tip
When you mark a disk or folder as non-searchable, Spotlight actually deletes its entire index (its invisible card-catalog filing system) from that disk. If Spotlight ever seems to be acting wackily, you can use this function to make it rebuild its own index file on the problem disk. Just drag the disk into the Privacy list and then remove it again. Spotlight deletes, and then rebuilds, the index for that disk.
(Don’t forget the part about “remove it again,” though. If you add a disk to the Privacy list, Spotlight is no longer able to find anything on it, even if you can see it right in front of you.)
Once you’ve built up the list of private disks and folders, close System Preferences. Spotlight now pretends the private items don’t even exist.
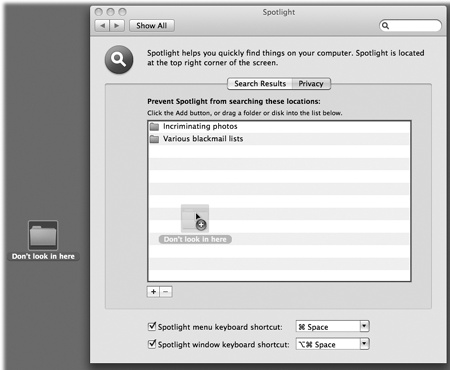
Figure 3-10. You can add disks, partitions, or folders to the list of
nonsearchable items just by dragging them from the desktop into
this window. Or, if the private items aren’t visible at the
moment, you can click the ![]() button, navigate to your hard drive, select
the item, and then click Choose. To remove something from this
list, click it and then press the Delete key or click the
button, navigate to your hard drive, select
the item, and then click Choose. To remove something from this
list, click it and then press the Delete key or click the
![]() button.
button.
Get Mac OS X Lion: The Missing Manual now with the O’Reilly learning platform.
O’Reilly members experience books, live events, courses curated by job role, and more from O’Reilly and nearly 200 top publishers.

