Once you have brought up the login screen , follow the instructions in this section to access the provisioning system.
The VOCAL system provides password-protected access to the Provisioning server. The provisioning login screen is shown in Figure 4-1.
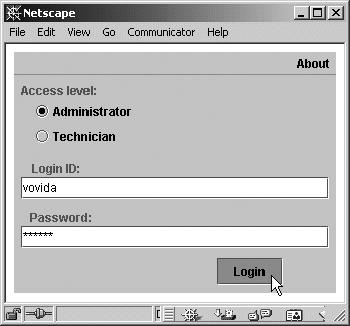
Table 4-1 explains the screen items and fields.
Table 4-1. Login screen item and field description
|
Item |
Description |
|---|---|
|
Access level |
Administrator As an Administrator, you can add, edit, or delete user entries. In addition, you can set up Feature servers for users. Technician As a Technician, you can edit the fields that control the servers as well as add or delete servers. |
|
Login ID |
The default is |
|
Password |
The default is See the next section, "Password Maintenance,” for information about setting your own user ID and password. |
There is a separate user interface for changing passwords and adding or removing accounts for administrators and technicians. (For information about editing the passwords for end users, see "Adding New Users" later in this chapter.)
At the time this is being written, password maintenance is not set up as an applet, but you can run it in standalone mode. The executable is included in the psClient.jar. The main class is:
vocal.pw.AdminAcctManager.
The syntax of the command is as follows:
java -classpath /path/to/psClient.jar:path/to/xerces.jar
vocal.pw.AdminAcctManager pServer_host pServer_port
On our test system, we typed, from /usr/java/jre1.3.1_01/bin:
java -classpath /usr/local/vocal/bin/psClient.jar:/usr/local/vocal/bin/xerces.jarvocal.pw.AdminAcctManager 192.168.10.10 6005
Tip
There is a space rather than a colon between pServer_host and pServer_port. If you insert a colon, the JRE will return an error.
The Manage Administrative Accounts screen appears with a list of all login IDs.
To log in as an administrator:
Select Administrator. You will select Technician later when you work with dialing plans and server configurations in Chapter 4.
Enter a valid login ID and password. The default for both is
vovida.
Get Practical VoIP Using VOCAL now with the O’Reilly learning platform.
O’Reilly members experience books, live events, courses curated by job role, and more from O’Reilly and nearly 200 top publishers.

