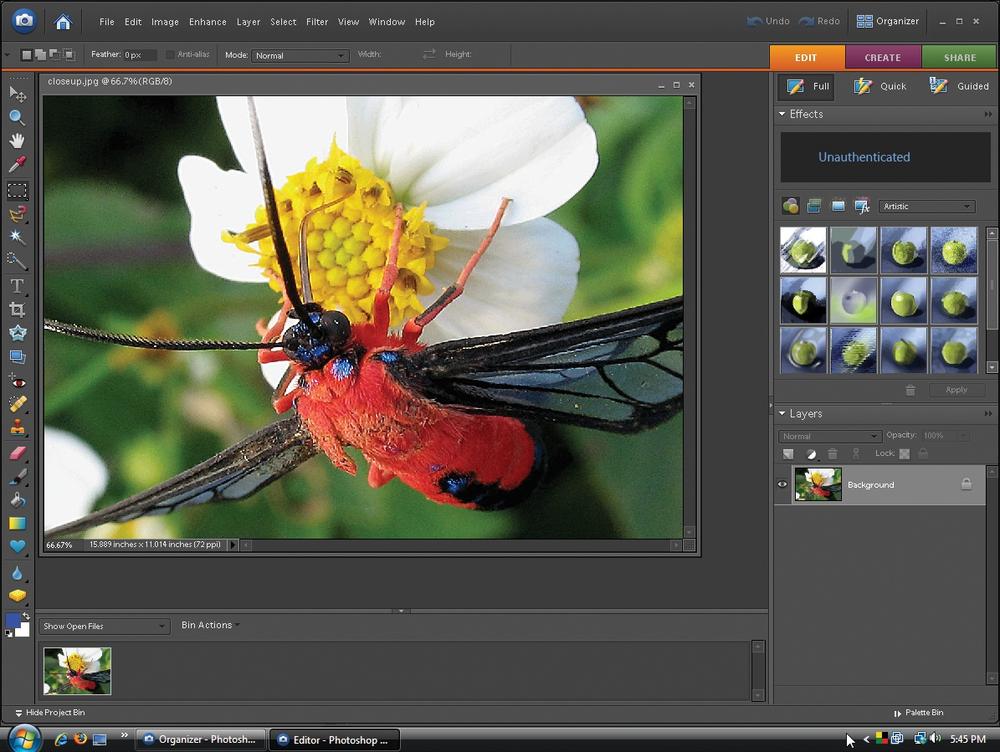
In addition to the Organizer, the other main component of Elements is the Editor (Figure 1-4). This is the fun part of Elements, where you get to edit, adjust, transform, and generally glamorize your photos, and where you can create original artwork from scratch with the drawing tools and shapes.
You can operate the Editor in any of three different modes:
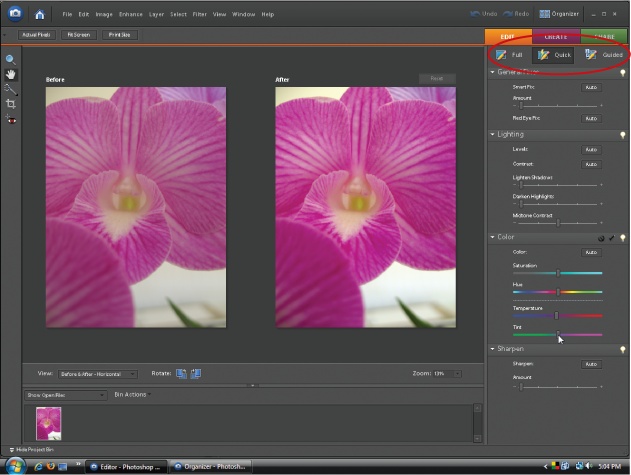
Quick Fix. For many beginners, Quick Fix (Figure 1-5) ends up as your main workspace. Adobe has gathered together the basic tools you need to improve most photos. It's also one of the two places in Elements where you can choose to have a before-and-after view while you work. (Guided Edit, described below, is the other.) Chapter 4 gives you all the details on using Quick Fix.
Full Edit. The Full Edit window gives you access to Elements' most sophisticated tools. You have far more ways to work on your photo in Full Edit than in Quick Fix, and if you're fussy, it's where you'll do most of your retouching work. Most of the Quick Fix commands are also available via menus in the Full Edit window.
Figure 1-4. The main Elements editing window, which Adobe calls Full Edit. In some previous versions of Elements it was known as the Standard Editor, something you might want to remember in case you ever try any tutorials written for Elements 3 or 4.
Figure 1-5. The Quick Fix window (shown here) and Guided Edit are the only places in Elements where you can see a before-and-after view of your photo as you work. Use the navigation buttons at the top of the screen (circled) to navigate from Full Edit to the Quick Fix window (and to Guided Edit, if you like) and back again.
Guided Edit This is new in Elements 6, and it can be enormously helpful if you're a newcomer to Elements. Basically, it provides a step-by-step walkthrough for popular projects such as cropping your photos and removing blemishes from them. Like Quick Fix, Guided Edit offers a before-and-after view of your photo as you work on it. Guided Edit is explained on Getting Help.
The rest of this chapter covers some of the basic concepts and key tools you'll come across in the Editor.
Note
If you leave a photo open in the Editor, when you switch back to the Organizer, you see a red band with a padlock across the photo's Organizer thumbnail as a reminder. To get rid of the lock and free up your image for Organizer projects, go back to the Editor and close the photo there.
Elements gives you an amazing array of tools to use when working on your photo. You get almost two dozen primary tools to help you select, paint on, and otherwise manipulate your photos, and many of the tools have as many as six subtools hiding beneath them (see Figure 1-6). Bob Vila's workshop probably isn't any better stocked than Elements' virtual toolbox.
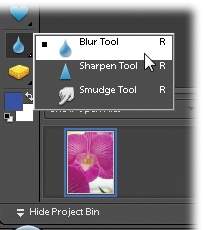
Figure 1-6. Like any good toolbox, the Elements Toolbox has lots of hidden drawers tucked away in it. Many Elements tools are actually groups of tools, which are represented by tiny black triangles on the lower-right side of the tool icon (you can't really see the triangle in the illustration because the pop-out menu obscures it). Holding the mouse button down as you click the icon brings out the hidden subtools. The little black square next to the Blur tool means it's the active tool right now.
Tip
When you want to explore every cranny of Elements, you need to open a photo (in the Editor, choose File → Open). Lots of the menus are grayed out if you have no file opened.
The long, skinny strip on the left side of the Full Edit window is the main Elements Toolbox, as you can see in Figure 1-6. It stays perfectly organized so that you can always find what you want without ever having to lift a finger to tidy it. And what's more, if you forget what a particular tool does, then hold your mouse over the tool's icon and a label (called a tooltip) appears. To activate a tool, click it. Any tool that you select comes with its own collection of options, as shown in Figure 1-7.

Figure 1-7. When a tool is active, the Options bar changes to show its available settings (circled). Elements tools are highly customizable, letting you do things like adjust a brush's size and shape. Here you see the options for the Brush tool. (The caterpillar-like thingy at the left is a sample of the stroke you'd get from the current brush settings.)
Incidentally, in Elements 6 your screen size determines the number of rows in the Toolbox. If you have a small screen, you have a double-column Toolbox. If your screen is large enough to show all the tools in one long column, that's how your Toolbox appears. If you'd rather have a more compact Toolbox, see the box "Doubling Up."
Other windows in Elements, like Quick Fix and the RAW Converter (see The RAW Converter), also have toolboxes, but none is as complete as the one in Full Edit.
Note
If you've used Elements before, you'll find an important difference in getting to subtools in Elements 6. The only way to choose a tool from a group in Elements 6 is by using the tool's pop-out menu in the Toolbox. You can't switch from one tool in a subgroup to another in the Options bar anymore.
Don't worry about learning the names of every tool right now. It's easier to remember what a tool is once you've used it. And don't be concerned about how many tools you have available. You probably have a bunch of Allen wrenches in your garage toolbox that you don't use more than a couple of times a year. Likewise, you'll find that you tend to use certain Elements tools more than others.
Tip
You can activate any tool with a keyboard shortcut, thereby saving a ton of time, since you don't have to interrupt what you're doing to trek over to the Toolbox. To see a tool's shortcut key, hover your mouse over the icon. A tooltip (Getting Help) pops up that tells you the shortcut key (it's the letter in parentheses).
Whether you're in the Editor or the Organizer, the right side of your screen is always pretty busy. Adobe calls this area the Task panel. You use it to select different modes, like whether to organize your photos or share them by email if you're in the Organizer, or whether to edit a photo or use it in a project if you're in the Editor.
Once you click a tab, you see your choices for that tab: the different editing modes under the Edit tab, for instance, or a list of projects you can make with the Create tab. You can collapse the main part of the Task panel to get it out of your way by clicking its left edge, but the main tabs are always visible. Click the edge again to bring the panel back.
In the Editor, the long narrow photo tray hogging the bottom of your screen is called the Project bin. It shows you what photos you currently have open, as explained in Figure 1-8, but it does a lot more than that.
At the upper left of the Project bin are two pull-down menus.
Show Open Files. This menu lets you determine what the Project bin is going to display: the photos currently open in the Editor, selected photos from the Organizer, or any of the albums (Albums and Smart Albums) you've made. If you send a bunch of photos over from the Organizer at once, you may think something went awry because no photo appears on your desktop or in the Project bin. If you switch the menu over to "Show Files from Organizer", you'll see your photos waiting for you in the bin.
Figure 1-8. The Project bin runs across the bottom of your screen. It holds a thumbnail of every photo you have open as well as photos you sent over from the Organizer that are waiting to be opened. If you have more photos than the bin can display at once, use the scroll bar on the right (where the cursor is in the figure) to see the rest of your photos. To change the active photo, double-click the thumbnail of the one you want and it moves to the front and becomes the active image. Here you see a bunch of files that have been sent over from the Organizer awaiting your editing.
Bin Actions. This is where the Project bin gets really useful. You can choose to use the photos in the bin in a project (Create), share them by any of the means listed under the Task Panel's Share tab, print them out, or make an album right there in the bin without ever going to the Organizer.

Note
If you don't use the Organizer, the Project bin is a particularly great feature, because it lets you create groups of photos that you can call up all together. Just put them in an album (Albums and Smart Albums), and then choose the name of the album from the "Show Open Files" menu when you want to see that group again.
You can drag your photos' thumbnails in the bin to rearrange them if you want to use the photos in a project.
The Project bin is a useful feature, but if you have a small monitor, sometimes you may prefer to have the space for your editing work. You can choose to make the bin collapse and hide until you move your mouse down to the bottom of the screen, causing it to jump back into view. Go to Editor → Edit → Preferences → General → "Project Bin auto-hide". This only works well on a fast and powerful computer, though—if you don't have a lot of horsepower, the bin can take a while to reappear.
If you find auto-hide too slow but you don't want to see the bin all the time, you can collapse and expand it manually. To close the bin, click the Hide Project Bin arrow at the lower left of your screen. Click the arrow again when you want the Project bin to reappear.
When you're in Full Edit, the Task panel displays the Palette bin. Elements stores palettes in this bin, letting you do things like keep track of what you've done to your photo (Undo History palette) and apply special effects to your images (Effects palette and Content palette).
It's possible that you'll like the Palette bin, but many people don't. If you don't have a large monitor, you may find it wastes too much desktop acreage, and in Elements, you need all the working room you can get. Fortunately, you don't have to keep your palettes in the bin; you can close the bin and just keep your palettes floating around on your desktop, or you can minimize them.
You open and close the bin by clicking the Palette bin button at the bottom of your screen (below the bin), or you can click the Palette bin's left edge (anywhere along the thin vertical bar). You can also pull palettes out of the bin by dragging the name bar of any palette. Figure 1-9 shows how to make your palettes even smaller once they're out of the bin. Freestanding palettes can also be combined with each other, as shown in Figure 1-10.
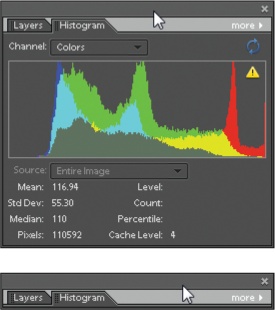
Figure 1-9. You can free up even more space by collapsing your palettes, accordion-style, once they're out of the bin. Top: To collapse a palette, double-click the palette's top bar. You can also toggle back and forth between expanded and contracted views by clicking the palette's Minimize button. Bottom: A shrunken palette.
Only two palettes are in the Palette bin to start with: Layers and Effects. To see how many more palettes Elements actually gives you, check out the Editor's main Window menu (the one at the top of your screen). When you select a new palette, it appears floating on the desktop. If you want to put a palette into the bin, click the little double arrow at the upper right of the palette and choose "Place in Palette Bin when Closed", and then click the Close button. The palette jumps into the bin. To take a palette out of the bin, drag it out, and then go back to the menu and deselect "Place in Palette Bin when Closed." The next time you close the palette, it disappears and you have to choose it from the Window menu to see it again.
Note
If you've been going crazy because you're trying to get rid of one of the bin's original palettes (either the Layers or Effects palette), but every time you close it, it just hops back into the bin, click the More button in the upper-right corner of the palette and turn off "Place in Palette bin when Closed." Next time you close the palette, it goes away and won't return till you choose it again from the Window menu.
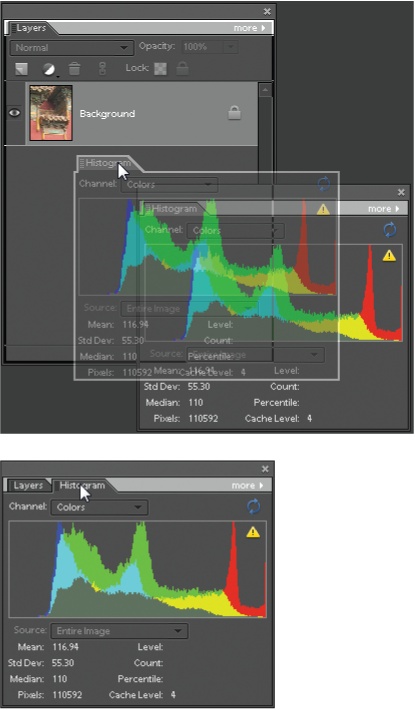
Figure 1-10. You can combine two or more palettes once you've dragged them out of the bin. Top: The Histogram palette is being pulled into, and combined with, the Layers palette. To combine palettes, drag one of them (by clicking on the palette's name bar) and drop it onto the other palette (notice the white line that appears on the top edge of the Layers palette, signaling it's "ready" to accept the Histogram palette). Bottom: To switch from one palette to another after they're grouped, just click the tab of the one you want to use. To remove a palette from a group, simply drag it off the palette window. If you want to return everything to how it looked when you first launched Elements, go to Window → Reset Palette Locations.
As Adobe adds more and more goodies to Elements, organizing everything so that you can get to it quickly has become something of a problem. To help reduce the clutter in Elements 6, Adobe has come up with a couple of new palettes, and new ways to navigate some old friends.
When you first start Elements, you see the Effects palette as one of the palettes in the bin. The Effects palette lets you add special effects to your images. It gives you access to filters (Using Filters), Layer styles (Adding Layer Styles), and Photo Effects (Adding Effects).
To use it, click the icon for the main type of effect you want, as explained in Figure 1-11, and then use the pull-down menu to choose a category. You apply the effect by double-clicking its thumbnail or clicking the thumbnail once, and then clicking Apply.
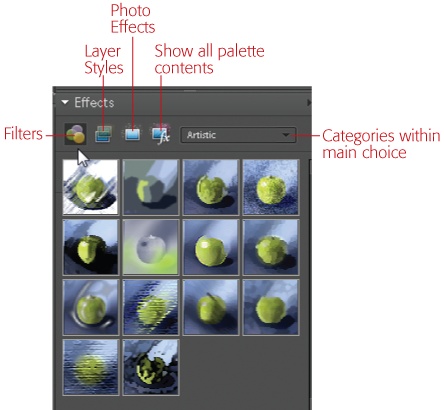
Figure 1-11. Use these buttons to choose what you see in the Effects palette: Filters, Layer Styles, Photo Effects, or all three
The other special palettes are the Content palette and the Favorites palette. They're actually loaded when you first start Elements, but you don't see them because they're hidden away in the Create tab. To see them, click Create. Just below the main Create tab, you'll see two sub-tabs. When you enter Create for the first time, Projects is the active tab. If you click the Artwork sub-tab, the Task panel switches over to show you the Content and Favorites palettes.
The Content palette holds backgrounds, frames, graphics, shapes, text effects, and themes to use in your projects. The Favorites palette provides a convenient parking space for everything from the Effects and Content palettes that you use all the time and want to keep handy. You can read more about how to use these palettes on Working with the Content and Favorites Palettes.
The Content and Favorites palettes tend to resist if you try to haul them out of the bin when you're in the Create tab's Artwork mode. If you want one (or both) of them on your desktop in Full Edit, it's easiest to start by going to the Window menu and choosing the palette there. Then you can dock it in the Palette bin if you like, or keep it free floating by using the methods described above. (They still appear in Artwork even when you set them to show in Full Edit, too.)
Note
Elements has one palette-related quirk. In the Window menu, visible palettes should have a check next to their names. (Palettes that are open in another tab but not currently visible have a dash next to their names.) But if you collapse a palette, even though the palette's name stays on your desktop, it remains unchecked in the Window menu. If you lose a collapsed palette (they occasionally get hidden behind the Options bar when you switch back and forth from Full Edit to Quick Fix or the Organizer), just select the palette's name in the list again to bring it back to the front where you can reach it. If all else fails, choosing Reset Palette Locations in the Window menu puts everything back in its original position.
Wherever Adobe found a stray corner in Elements, they stuck some help into it. You can't move anywhere in this program without being offered some kind of guidance. Here are some of the ways you can summon assistance if you need it:
Help menu. Choose Help → Photoshop Elements Help, or simply press F1. Elements launches your Web browser and you'll see the Elements Help files displayed there. In the Help window, you can search or browse a topic list and glossary.
Tooltips. The text that pops up under your mouse as you move around Elements is linked to the appropriate section in Elements Help. Click a tooltip for more information about whatever your mouse is hovering over.
Dialog box links. Most dialog boxes have a few words of bright blue text somewhere in them. That text is actually a link to Elements Help. If you get confused about what the settings for a filter do, for instance, then click the blue text in the settings dialog box for a reminder.
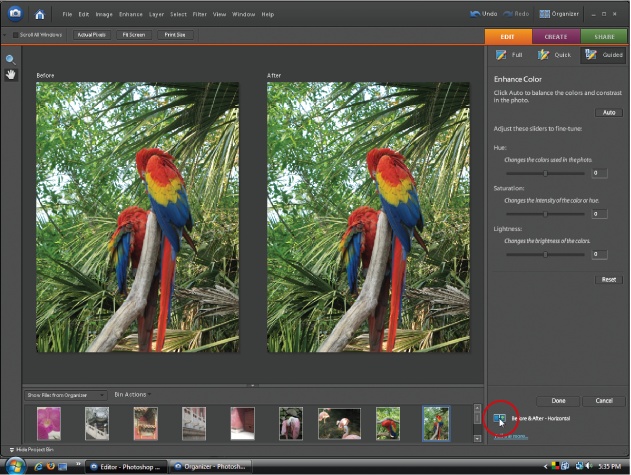
If you're a beginner, your biggest help in Elements may be the new Guided Edit feature, shown in Figure 1-12. Guided Edit walks you through a variety of the editing tasks you're likely to want to do, like cropping, sharpening, correcting colors, and removing blemishes.
Guided edit is really easy to use:
Go to Guided Edit.
Click the Edit tab → Guided.
Open a photo.
Press Ctrl+O and choose your photo in the window that appears. If you already have a photo open, it appears in the Guided Edit window automatically. If you have several photos in the Project bin, you can switch images by double-clicking the thumbnail of the one you want to work on.
Figure 1-12. Guided Edit gives you step-by-step help with basic photo editing. Just use the tools that appear in the task panel once you choose an activity. After you've selected a task, you can change the view of your photo to Before and After. Keep clicking the little blue button (circled) at the bottom of the window to toggle views between After Only, Before & After—Horizontal, and Before & After—Vertical.
Your options are grouped into major categories like Basic Photo Edits and Color Correction, with a variety of individual projects under each heading. Just click the specific task you want in the list on the right side of the window. The Task panel switches to show you the buttons and/or sliders you need to use.
Make your adjustments.
Just move the sliders and click the buttons till you like what you see. If you want to start over, click Reset. If you change your mind about the whole project, click Cancel.
If there are several steps (like there are in "Guide for Editing a Photo", for instance), Elements will show you just what you need to use for the current step, then switch to a new set of choices for the next step as you go along.
Click Done to finish.
If there are more steps, you may see another set of instructions. If you see the main list of topics again, you're all through. Don't forget to save your changes (Searching by Metadata). To close your photo, press Ctrl+W, or leave it open and switch to another tab to share it or use it in a project.
If you need to adjust your view of your photo while you work on it, Guided Edit has a little toolbox with the Hand (The Hand Tool) and Zoom (The Zoom Tool) tools to help you out.
Note
Guided Edit shows you quick and easy ways to change your image, but you won't always get the best possible results. It's a great tool for starting out, but don't make the mistake of thinking what you see here is the best you can possibly do for your images. Once you're more comfortable in Elements, Quick Fix (Chapter 4) is a good next step.
Photoshop Elements has a couple of really wonderful features to help you avoid making permanent mistakes: the Undo command and the Undo History palette. After you've gotten used to them, you'll probably wish it were possible to use these tools in all aspects of your life, not just Elements.
No matter where you are in Elements, you can almost always change your mind about what you just did. Press Ctrl+Z and the last change you made goes away. Pressing Ctrl+Z works even if you've just saved your photo, but only while it's still open. (If you close your picture, your changes are permanent.) Keep pressing Ctrl+Z and you keep undoing your work, step by step.
If you want to redo what you just undid, just press Ctrl+Y. These keystroke commands are great for toggling changes on and off while you decide whether you really want to keep them. You can use the Undo/Redo keystroke combinations in the Organizer as well as the Editor.
Tip
You do have some control over the key combination you use for Undo/Redo, if you don't like the Ctrl+Z combination. Go to Edit → Preferences → General. Elements gives you two other choices, both of which involve pressing the Z key in combination with the Control, Alt, and Shift keys. You can't just assign any key combination you like because you're used to it in another program.
In the Full Edit window, you get even more control over the actions you can undo, thanks to the Undo History palette (Figure 1-13), which you open by choosing Window → Undo History.
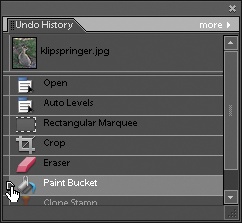
Figure 1-13. For a little time travel, just slide the pointer up and watch your changes disappear one by one. You can only go back sequentially. Here, for instance, you can't go back to Crop without first undoing the Paint Bucket and the Eraser. Slide the pointer down to redo your work. You can also move to a different point in your work by just clicking the place in the list where you want to go, instead of using the slider. (If you squint very hard at the bottom of the figure, you can see that the Clone Stamp is already Undone.)
This palette holds a list of the changes you've made since the last time you opened your image. Just push the slider up and watch your changes disappear one by one as you go. Undo History even works if you've saved your file: As long as you haven't closed your file, the palette tracks every action you take. You can also slide the other way to redo changes that you've undone.
Be careful, though. You can back up only as many steps as you've set Elements to remember. Elements lets you keep track of as many as 1,000 actions. You can regulate this number in Preferences, as explained in Figure 1-14.
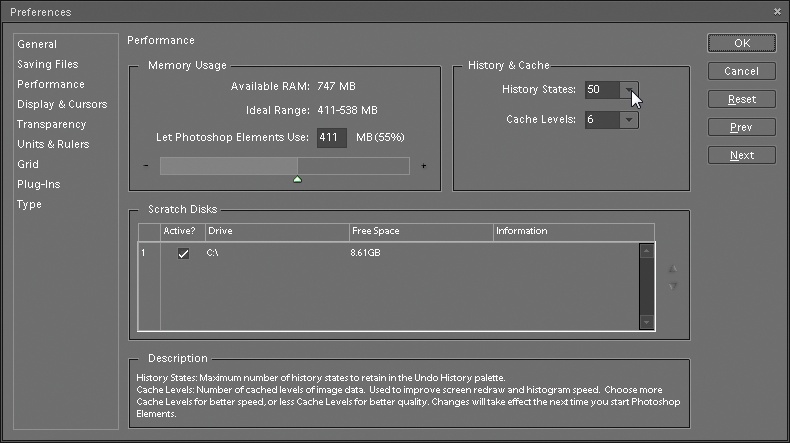
Figure 1-14. You can set the number of steps the Undo History palette remembers in Edit → Preferences → Performance → History & Cache. Elements initially sets it to 50, but you can set it as high as 1,000. Beware, though—remembering even 100 steps may slow your system to a crawl if you don't have a superpowered processor, plenty of memory, and loads of disk space. If Elements runs slowly on your machine, then reducing the number of history states it remembers (try 20) may speed things up a bit.
As you're probably beginning to see, Elements lets you work in lots of different ways. What's more, most people who use Elements approach projects in different ways. What works for your neighbor with her pictures may be quite different from how you would choose to work on the very same shots.
However, you'll hear one suggestion from almost every Elements veteran, and it's an important one: Never ever work on your original. Always, always, always make a copy of your image and work on that.
The good news is that if you store your photos in the Organizer, you don't need to worry about accidentally trashing your original. Elements automatically creates a copy when you edit a photo that's cataloged in the Organizer, so that you can always revert to your original.
Note
The Organizer's version sets provide another great safety net. They let you make as many different editions of your photo as you like without compromising your original. Searching by Metadata has full details.
If you're determined not to use the Organizer, follow these steps to make a copy of your image:
Right-click the title bar of the Image window and choose Duplicate, or go to File → Duplicate.
The Image window is the smaller window within the Editor where your photo appears.
Name the duplicate, and click the close button (the X at the upper right of the image window) on the original.
Now the original is safely tucked out of harm's way.
Save the duplicate using Ctrl+S.
Choose Photoshop (.psd) as the file format when you save it. (You may want to choose another format after you've read Chapter 3 and understand more about your different format options.)
Now you don't have to worry about making a mistake or changing your mind, because you can always start over if you want to.
Note
Elements doesn't have an autosave feature, so you should get into the habit of saving frequently as you work. Read more about saving on Searching by Metadata.
Get Photoshop Elements 6: The Missing Manual now with the O’Reilly learning platform.
O’Reilly members experience books, live events, courses curated by job role, and more from O’Reilly and nearly 200 top publishers.

