Windows XP offers two different techniques for moving files and folders from one place to another: dragging them, and using the Copy and Paste commands.
Whichever method you choose, you must start by showing Windows which icons you want to copy or move—by highlighting them.
To highlight (that is, select) one icon, just click it once. But you don’t have to move, copy, or delete one icon at a time; you can select a number of icons in the same folder or disk window. You may want to employ this technique, for example, when moving a bunch of documents from one folder to another, or copying them onto a backup disk en masse.
Tip
It’s easiest to work with multiple icons in Details view (Section 3.2.1.2), where every icon appears in a single column.
To highlight multiple files in preparation for moving, copying, or deleting, use one of these techniques:
To select all the icons in a window, press Ctrl+A (the keyboard equivalent of the Edit→Select All command).
You can drag across file and folder names to highlight a group of consecutive icons. Start with your cursor above and to one side of the icons, then drag diagonally. As you drag, you create a temporary dotted-line rectangle. Any icon that falls within this rectangle darkens to indicate that it’s been selected.
Alternatively, click the first icon you want to highlight, and Shift-click the last file. All the files in between are automatically selected, along with the two icons you clicked. (These techniques work in any folder view: Details, Thumbnails, or whatever.)
Suppose you want to highlight only the first, third, and seventh icons in the list. Start by clicking icon No. 1, then Ctrl-click each of the others. (If you Ctrl-click a selected icon again, you deselect it. A good time to use this trick is when you highlight an icon by accident.)
As you know, you can drag icons from one folder to another, from one drive to another, from a drive to a folder on another drive, and so on. (When you’ve selected several icons, drag any one of them and the others will go along for the ride.)
Here’s what happens when you drag icons in the usual way (using the left mouse button):
Dragging to another folder on the same disk moves the folder or file.
Dragging from one disk to another copies the folder or file.
Pressing the Ctrl key while dragging to another folder on the same disk copies the icon. (If you do so within a single window, Windows creates a duplicate of the file called “Copy of [filename].”)
Pressing Shift while dragging from one disk to another moves the folder or file (without leaving a copy behind).
Pressing Alt while dragging an icon creates a shortcut of it.
Tip
You can move or copy icons by dragging them either into an open window or directly onto a disk or folder icon.
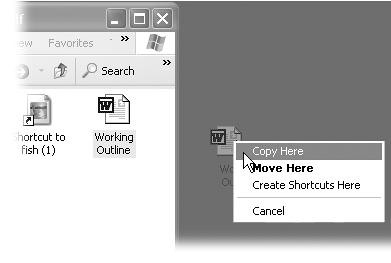
Think you’ll remember all of those possibilities every time you drag an icon? Probably not. Fortunately, you never have to. One of the most important tricks you can learn is to use the right mouse button as you drag. When you release the button, the menu shown in Figure 4-6 appears, so that you can either copy or move the icons.
You may find it easier to copy or move icons in Windows Explorer, since the two-pane display format makes it easier to see where your files are and where they’re going. (See Section 4.1.4 for a list of the ways to open the Explorer window.) Here’s how to do it:
Make the destination folder visible by clicking the + buttons next to your folder names, expanding your folder “tree” as necessary.
For example, to copy an icon into a certain folder, click the Local Disk (C:) icon to see its list of folders. If the destination is a folder within that folder, expand its parent folder as necessary.
In the left pane, click the icon of the disk or folder that contains the icon you want to manipulate.
Its contents appear in the right pane.
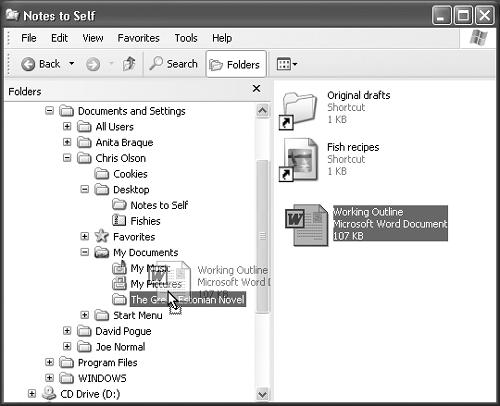
Locate the icon you want to move in the right pane, and drag it to the appropriate folder in the left pane (see Figure 4-7).
Figure 4-7. The file Working Outline, located in the Notes to Self folder on the desktop, is being dragged to the folder named The Great Estonian Novel (in the My Documents folder). As the cursor passes each folder in the left pane, the folder’s name darkens to show that it’s ready to receive the drag-and-dropped goodies. Let go of the mouse button when it’s pointing to the correct folder or disk.
Windows copies the icon.
Dragging icons to copy or move them feels good because it’s so direct. You actually see your arrow cursor pushing the icons into the new location.
But you also pay a price for this satisfying illusion. That is, you may have to spend a moment or two fiddling with your windows, or clicking buttons in the Explorer folder hierarchy, so that you have a clear “line of drag” between the icon to be moved and the destination folder.
Fortunately, there’s a better way: You can use the Cut, Copy, and Paste commands to move icons from one window into another. The routine goes like this:
POWER USERS’ CLINICSecrets of the Send To Command
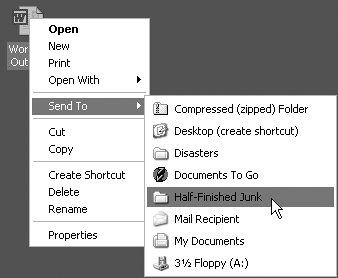
If you find yourself copying or moving certain icons to certain folders or disks with regularity, it’s time to exploit the File→Send To command that lurks in every folder window (and in the shortcut menu for almost every icon).
This command offers a quick way to copy and move highlighted icons to popular destinations. For example, you can teleport a copy of a highlighted file directly to a floppy disk by choosing File→Send To→3 1/2 Floppy, or to a blank CD by choosing Send To→CD Burner. You’re spared the tedium of choosing Copy, selecting the floppy drive, and choosing Paste.
Another useful command is Send To→“Desktop (create shortcut),” which dumps a shortcut icon onto your desktop background. Then there’s the Send To→Mail Recipient, which bundles the highlighted icon as an email attachment that’s ready to send. You can also zip up a folder (see Chapter 15) by choosing Send To→“Compressed (zipped) Folder.”
But the real power of the Send To command is its ability to accommodate your own favorite or frequently used folders. Lurking in your My Computer→Local Disk (C:)→Documents and Settings→[Your Name] folder is a folder called SendTo. Any shortcut icon you place here shows up instantly in the Send To menus within your desktop folders and shortcut menus.
Alas, this folder is among those that Microsoft considers inappropriate for inspection by novices. As a result, the SendTo folder is hidden in Windows XP.
To make it appear, open any folder window. Choose Tools→Folder Options, click the View tab, turn on “Show hidden files and folders”, and click OK. Now, when you open your own account folder, you’ll see the SendTo folder.
Most people create shortcuts here for folders and disks (such as your favorite backup disk). When you highlight an icon and then choose Send To→Backup Zip, for example, Windows XP copies the icon to that disk. (And if you simultaneously press Shift, you move the icon to the other disk or folder.)
You can even add shortcuts of applications (program files) to the SendTo folder. By adding WinZip to this Send To menu, for example, you can drop-kick a highlighted icon onto the WinZip icon (for decompressing) just by choosing Send To→WinZip. You can even create shortcuts for your printer or fax modem, so that you can print or fax a document just by highlighting its icon and choosing File→Send To→[printer or fax modem’s name].
Highlight the icon or icons you want to move or copy.
You can use any of the tricks described in Section 4.3.
Right-click one of the icons. Choose Cut or Copy from the shortcut menu.
Alternatively, you can choose Edit→Cut or Edit→Copy, using the menu bar at the top of the window. (Eventually, you may want to learn the keyboard shortcuts for these commands: Ctrl+C for Copy, Ctrl+X for Cut.)
The Cut command makes the highlighted icons show up dimmed; you’ve now stashed them on the invisible Windows Clipboard. (They don’t actually disappear from their original nesting place until you paste them somewhere else.)
The Copy command also places copies of the files on the Clipboard, but doesn’t disturb the originals.
Right-click the window, folder icon, or disk icon where you want to put the icons. Choose Paste from the shortcut menu.
Once again, you may prefer to use the appropriate menu bar option—Edit→Paste. Keyboard equivalent: Ctrl+V.
Either way, you’ve successfully transferred the icons. If you pasted into an open window, you’ll see the icons appear there. If you pasted onto a closed folder or disk icon, you need to open the icon’s window to see the results. And if you pasted right back into the same window, you get a duplicate of the file called “Copy of [filename].”
Get Windows XP Professional: The Missing Manual now with the O’Reilly learning platform.
O’Reilly members experience books, live events, courses curated by job role, and more from O’Reilly and nearly 200 top publishers.

