In the old days (two years ago), every PC came with a CD-ROM drive. Nowadays, most new PCs come with a CD burner, a drive that can record new CDs that contain your own stuff.
If your PC has such a drive—either a CD-R drive (CD recordable, which means you can record each disc only once) or a CD-RW drive (CD rewritable, for which you can buy CD-RW discs that you can erase and re-record as many times as you like), you’re in for a treat. For the first time, Windows XP lets you burn your own CDs full of files and folders without having to buy a program like Roxio’s Easy CD Creator ( http://www.roxio.com/en/products/ecdc ).
That’s because Windows XP includes Easy CD Creator (pieces of it, anyway). That’s a great feature for making backups, emailing people, or exchanging files with a Macintosh (the resulting CDs are cross-platform).
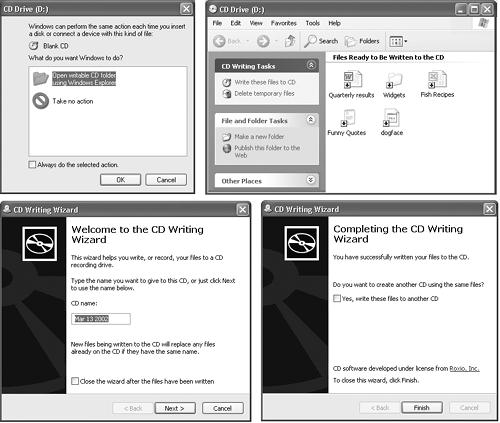
If your PC does, in fact, have a CD burner, start by inserting a blank CD. Windows offers to open a special CD-burning window, which will be the temporary waiting room for files that you want to copy to the CD (Figure 4-11, top left).
Figure 4-11. Top left: When you insert a blank CD, this window appears, offering to open the CD “staging grounds” window that will hold shortcuts for the files you want to copy. Top right: The little down-arrows mean, “This icon hasn’t been burned yet.” Lower left: The first screen of the CD Writing Wizard is your only chance to name the CD (even if it’s a CD-RW disc). Lower right: The final screen offers the chance to make a second copy of the same CD.
Note
If you’ve turned off this feature, you can open the CD window yourself: Open My Computer, and then double-click the CD icon.
Now tell Windows which files and folders you want copied onto it, using one of these three methods:
Scurry about your hard drive, locating the files and folders you want on the CD. Drag their icons into the open CD window, or onto the CD icon in the My Computer window.
Highlight the files and folders you want burned onto the CD. Choose File→Copy. Click in the CD’s window, and then choose File→Paste to copy the material there.
Explore your hard drive. Whenever you find a file or folder you’d like backed up, right-click it. From the shortcut menu, choose Send To→CD Drive.
Note
All of this pertains to copying everyday computer files onto a CD. If you want to burn music CDs, don’t use this method. Use Windows Media Player instead. (See Section 8.3.6 for details.)
In any case, Windows now copies the files and folders into a temporary, invisible holding-tank folder. (If you’re scoring at home, this folder is in the Local Disk C:)→Documents and Settings→[Your Name]→Local Settings→Application Data→Microsoft→CD Burning folder.) In other words, you need plenty of disk space before you begin burning a CD, at least double the size of the CD files themselves.
Tip
Remember that a standard CD can hold only about 650 MB of files. To ensure that your files and folders will fit, periodically highlight all the icons in the My Computer→CD window (choose Edit→Select All). Then inspect the Details box in the task pane to confirm that the Total File Size is within the legal limit.
At last, when everything looks ready to go, click the “Write these files to CD” link in the task pane (top right in Figure 4-11), or choose File→Write these files to CD.
The CD Writing Wizard appears, as shown at bottom in Figure 4-11, to guide you through the process of naming the new CD and burning the disc.
Note
When using a CD-RW disc (that is, one that you can erase and re-record), you can’t change the disc’s name once it’s been recorded for the first time. You can still replace its contents using the techniques described here, though.
Hard-core Windows power users, of course, sneer at all this. Only with a commercial CD-burning program, they point out, can you burn MP3 music CDs, create mixed-mode CDs (containing both music and files), create Video CDs (low-quality video discs that play on DVD players), and so on.
Still, if you use your burner primarily for quick backups, long-term storage, or transferring big files to other computers, a little bit of free software goes a long way.
Get Windows XP Professional: The Missing Manual now with the O’Reilly learning platform.
O’Reilly members experience books, live events, courses curated by job role, and more from O’Reilly and nearly 200 top publishers.


