Whether you’ve just started using Mac OS X or switched a long time ago, you should take some time to individualize your new computing world. After all, the odds that Apple came up with an operating system that perfectly suits you, NASA scientists, and the 8-year-old down the street are pretty slim.
Like it or not, Mac OS X comes with a number of built-in features that you may not need; they also drink up memory and horsepower that could be used for stuff you do care about. Called services in Apple-speak, they include Personal File Sharing, Windows Sharing, Personal Web Sharing, Remote Login, FTP Access, Remote Apple Events, Printer Sharing, and so on.
To limit the amount of memory these services use, simply turn off the ones you don’t need. If you’re not on a network (or the Internet), you don’t need any of them. If you share files with a Mac or a Windows PC on a network, though, leave on Personal File Sharing (for sharing with other Macs) and/or Windows Sharing (for sharing with networked PCs).
To turn these features on and off, choose
→ System Preferences. Click the Sharing icon, click the Services tab, and check off the corresponding checkboxes.
It’s a classic problem. You’re sitting in a large office, with printers scattered all over the premises. You print an important document and have no clue where to pick it up. (This situation is especially worrisome if what you’re printing is your resumé and cover letter to a headhunter.)
Fortunately, Figure 1-9 illustrates a sneaky trick that reveals the name of the Mac that’s attached to a certain printer, the better to help you stalk it down.
Every night, without complaint or fuss, Mac OS X performs a series of system-maintenance tasks: exciting things like cleaning up temporary files left by your programs, updating databases that track files, and deleting system logs. Without these regular operations, you’ll wind up with wasted hard drive space and some file searches won’t work.
But Mac OS X only does its janitorial duties if you leave your machine on overnight, wasting energy and filling the room with the hum of its fan.
That leaves you two options for running the maintenance programs. You can either get your hands dirty and run them yourself in Terminal (see Chapter 15), or you can use a program like MacJanitor (available at http://personalpages.tds.net/~brian_hill/macjanitor.html) to run them manually.
To use MacJanitor, double-click its icon, click the padlock icon next to “Click to allow tasks,” and enter your administrator’s password when prompted (Sidebar 1.1). The Daily, Weekly, Monthly, and All Tasks buttons in the toolbar spring to life.
Choose Help → MacJanitor Help for a technical explanation of what each cleanup routine does, and then run the ones that sound good to you. If you haven’t left your machine on for a long time (so that the normal tasks never had a chance to run), just select All Tasks the first time you run the program. After that, you can follow the suggested schedule and run the appropriate tasks daily, weekly, or monthly.
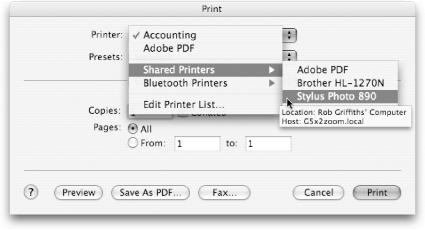
Figure 1-9. From within an application, select a printer from the pop-up list in the Print dialog box, and then point to it with the mouse. A yellow tag appears showing the name of the machine that’s hosting the printer. Of course, this trick won’t actually help much if the machines aren’t logically named after users or locations, but it’ll still make you feel like an insider.
You might not expect to need help with Help. After all, this built-in, online help system is supposed to be self-explanatory.
It’s not.
For proof, go to the Finder and choose Help → Mac Help (or hit
-?) to open the Help Viewer (Figure 1-10). This simple interface is hiding a ton of detailed information on many of your machine’s programs, but you may not know that, especially if you used previous versions of OS X. Prior to 10.3, Apple provided a “drawer” that showed every application for which you could find help topics. In 10.3, this useful information has been moved to the Library menu.
Help serves as the master help system for most OS X applications (excluding various Terminal applications). The theory of bunching up all of your programs’ help in one master program is that it allows you to cross-search. If you’re in iPhoto, for example, and you’re having trouble printing, you might not know that the Printing topics are in the standard Mac OS X help and not the iPhoto-specific help.
Your main interaction with the Help Viewer will probably be through the search box on the toolbar. Type your question in plain English (“How do I print?” for example), and then press Return or Enter to make Help Center find topics that match your query.
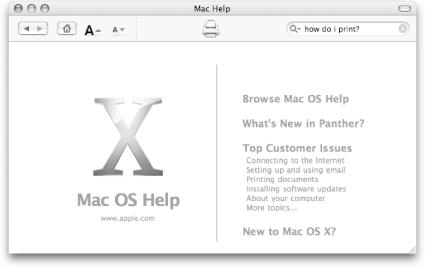
Figure 1-10. The Help Viewer application can help you learn the details of Mac OS X and many of your installed applications. The Help Viewer can also connect to the Internet to check for updated data, which may be more current than the help files on your hard drive.
Tip
If you’re sure that the information you want to find is in the current program’s help file, you can narrow down your search results by clicking the magnifying glass icon in the search box and selecting “Search [Current Program] Help.”
The results page contains columns with the topics’ names, Help Viewer’s estimate of their relevance to your query, and a Location column showing which section of the Help Center contains the topics. You can sort by a different criterion by clicking a different heading; if you double-click a heading, the order of the items will be reversed.
The fun doesn’t end there, however. For Panther, Apple based Help Viewer on Safari’s web engine—and it shows. Some examples:
The navigation buttons are the same.
As in Safari, you can hold down the mouse on the back and forward buttons in Help Viewer to see a list of pages you’ve visited in the past few minutes.
They both support drag-and-drop.
You can drag a picture from Help Viewer into a word processing document, iMovie project, or iPhoto album, just as you can with Safari. You can even drag links from Help Viewer into Safari, if you’d rather read your help files there.
They both let you browse more than one page at once.
In Safari, you choose File → New Window to open a new window. In Help Viewer, choose File → New to accomplish the same thing.
If you use the Help Center often, you owe it to yourself to spend a couple of minutes customizing its toolbar by adding buttons for commonly used tasks. Start by selecting View → Customize Toolbar, and then drag the buttons you’d like to add up to the toolbar. In Figure 1-10, buttons have been added to make the font size larger or smaller, and a printer icon (set off with a separator and surrounded by flexible space) has been included for one-click printing. With these simple changes, you’ll find the Mac OS X Help not only helpful, but easier to use.
Get Mac OS X Power Hound, Second Edition now with the O’Reilly learning platform.
O’Reilly members experience books, live events, courses curated by job role, and more from O’Reilly and nearly 200 top publishers.

