Introduction
When it first came out, SketchUp caused quite a stir in the three-dimensional (3-D) art world for a couple of reasons. First, it’s the easiest program you can use to create three-dimensional models of buildings, furniture, and everyday objects. And second, you can get your hands on a fully useful copy for free.
People haven’t always found it easy to draw three-dimensional images on two-dimensional surfaces. Just ask the Lascaux cave artists or anyone who sat in art class studying 2-point and 3-point perspective. Even with computers helping out, you can still run into problems. Most 3-D graphics programs have learning curves like the Eiffel Tower and they cost a fortune. In 2000, SketchUp came along and changed the rules by making 3-D drawing almost as easy as drawing on the back of a napkin. Three years later, Google acquired the company that developed SketchUp (@Last Software), since the program works so well with their online program Google Earth.
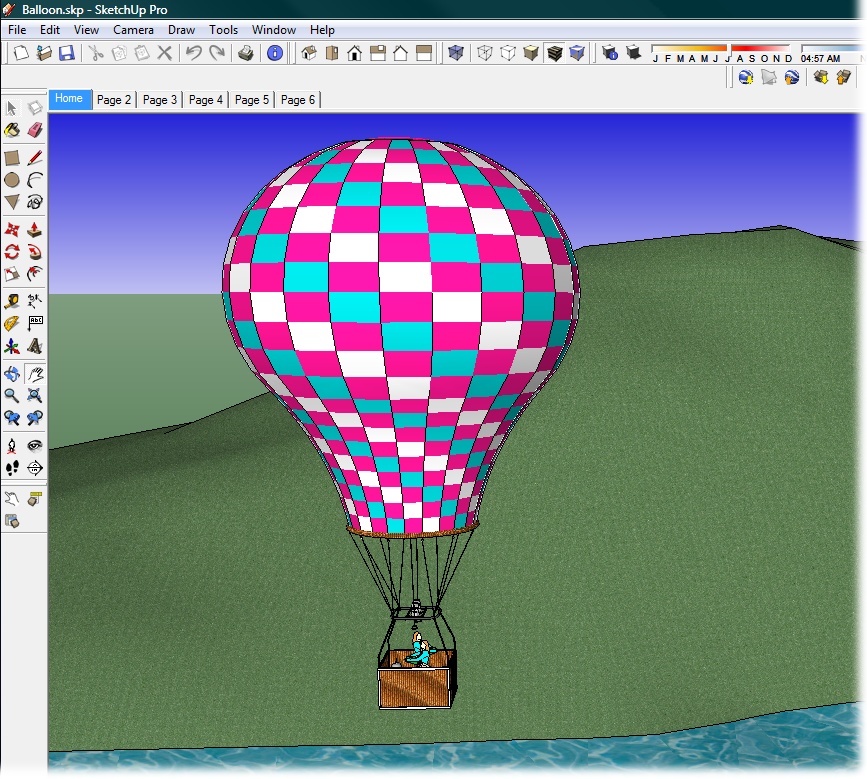
With SketchUp, you start off with simple tools that are familiar if you’ve ever used a computer to draw rectangles or circles. Then, to create 3-D objects, you use specially designed tools to push and pull your objects into the desired Ferraris or hot-air balloons (Figure 1). Pushing and pulling may sound like a haphazard way to build models, but that’s far from the case. SketchUp lets you create models that are accurate down to a fraction of an inch. Also, using SketchUp’s component tools, you can minimize repetitive tasks and build complex models quickly. When you’re done, go ahead and place your model on a map of the world using Google Earth.
So, what’s the catch? There isn’t one. All you have to do is download the program from http://sketchup.google.com. Then follow along in this book, and you’ll become a SketchUp master artist in no time.
Note
SketchUp Pro, the pay-to-play version, costs $495. It’s meant primarily for architects and builders who need to share their 3-D work with programs like AutoCAD. If you’re not one of them, relax. You can use the free version of SketchUp forever, and the program won’t even nag you to upgrade to Pro.
What You Can Do with SketchUp
As the name implies, SketchUp lets you create 3-D artwork quickly. SketchUp does a few things, and it does them very well. Here’s a short list of the jobs SketchUp does well:
Create models of buildings, furniture, and other everyday objects.
Design models with interior and exterior details, like houses with individual rooms.
Quickly design special architectural elements, like pitched or complex roofs.
Create reusable parts that you can use in other models.
Easily add colors and textures.
Create landscaping around buildings.
Add accurate shadow effects based on geographic location, time, and date.
Place models in a specific location on the Google Earth map.
Develop 3-D models from 2-D photographs or drawings.
Produce walk-through animations.
By contrast, here’s a short list of jobs other—that is, more expensive—3-D programs perform better than SketchUp:
Character animation with moveable joints.
Organic elements such as realistic hair or fur.
Complex lighting using multiple light sources.
Kinetic effects in animation such as bouncing balls or flying bullets.
Elemental effects such as flames, smoke, and explosions.
Animations where characters move about a scene.
Complex architectural designs detailing every electrical wire and pipe in a building.
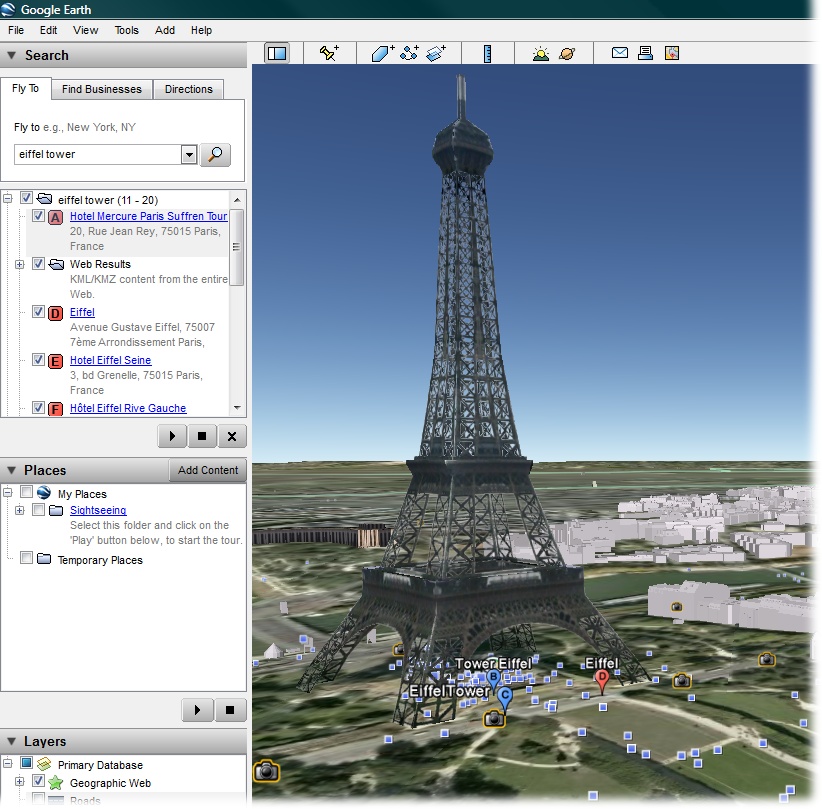
So, you won’t use SketchUp to create a 3-D feature film that competes with Shrek or to design a computer game. But once you get the hang of it, you can create great-looking 3-D drawings very quickly. Most people use SketchUp to model buildings, but you can just as easily create other 3-D objects like furniture and appliances. Because SketchUp can export artwork in Google Earth’s .kmz format, you can place your SketchUp models on the map as shown in Figure 2.
SketchUp vs. SketchUp Pro
SketchUp is available in two flavors: the free version and the $495 SketchUp Pro version. Let your wallet and your 3-D needs be your guide.
SketchUp (free)
With the free version, you can design complex 3-D models and print pictures and export 2-D art to use in websites or other programs. You can save your model as a JPEG or PNG file and edit it in Photoshop. You can also save your models in the .kmz file format that lets you place models in Google Earth. Here’s the lowdown on the file formats you can create with SketchUp:
Standard 3-D file format: .skp. You can also save to formats used by earlier versions of SketchUp.
Google Earth: .kmz. Place your models anywhere on the planet!
2-D image files: JPEG (.jpg), Portable Network Graphics (.png), Tagged Image File (.tif), Windows Bitmap (.bmp). You can both import and export images in all of these formats, and also import Targa files (.tga).
3-D models: SketchUp (.skp); Google Earth terrain, 3DS (.3ds); AutoCAD (.dwg, .dxf); DEM (.dem, .ddf). You can import models created in all of these formats, and export your own models as SketchUp (.skp) or Google Earth (.kmz).
Animations and walk-throughs. Video for Windows (.avi); QuickTime (.mov) files on Mac.
Tip
You’ll learn all about importing and exporting with SketchUp in Chapter 13.
SketchUp Pro ($495)
The SketchUp Pro version gives you many more ways to share your 3-D models with other programs, like AutoCAD, or 3d Studio Max. It lets you use all of the same file formats as the free version, plus more:
2-D image files. You can import and export all of the same file formats as the free version, plus export in the following additional formats: Portable Document Format (.pdf), Encapsulated PostScript Format (.eps), Epix (.epx), and AutoCAD (.dwg, .dxf).
3-D models. You can import and export all of the same file formats as the free version, plus export in the following additional formats: 3DS (.3ds), AutoCAD DWG (.dwg), AutoCAD DFX (.dfx), FBX (.fbx), OBJ (.obj), XSI (.xsi), and VRML (.vrml).
The Pro version includes two additional programs:
LayOut gives you a set of tools that let you place, arrange, title, and annotate SketchUp models for computer and print presentations.
Style Builder helps you customize the look of your SketchUp drawings. Want to produce a 3-D drawing of a client’s new home that looks as if it were laboriously hand-drawn? It’s a snap with Style Builder.
In short, the Pro version gives you better ways to work with other pros and the ability to communicate more complex 3-D details to clients and colleagues.
Entering the Third Dimension
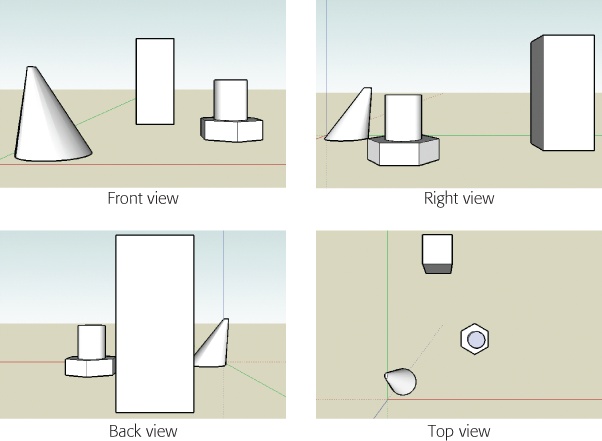
In most graphics programs like Adobe Illustrator or Photoshop you move only in two dimensions: up/down and left/right. It’s like looking at a flat sheet of paper through a window. You move the window up/down or left/right to see other parts of the paper. Even if you zoom in or zoom out, the details on the paper merely get larger or smaller, while the relative positions of drawings on the paper remain the same. In 3-D programs like SketchUp, you have another dimension, which you can think of as depth. Imagine you’re walking forward into the scene, or backing away, expanding your field of vision. SketchUp refers to your view as the Camera, and that’s a great way to understand the difference between 2-D and 3-D. Instead of looking through a window at a flat piece of paper, you’re looking through a camera at a three-dimensional world. You can look at any of the objects in this world from any angle including front, back, top, or bottom. As you move the camera in the 3-D world, the positions and relationships of the other objects appear to change. They aren’t really moving, but because you’ve changed position everything looks different, as shown in Figure 3.
Drawing in 3-D Without Getting Lost
If you’re new to the world of 3-D design, sooner or later you’re bound to get lost. It happens to everyone, and it’s just part of the learning process. For example, you may have zoomed in so closely to a part of your model that nothing looks familiar. Or maybe you’ve maneuvered the view so you don’t see your model at all; you think you’re looking off into blank space.
Don’t panic. This book provides tips throughout for finding your bearings and moving around your SketchUp world. Here’s your first tip for returning to a familiar view of your project: Choose Camera → Zoom Extents to get a view of every object in your SketchUp world. Then choose Camera → Standard Views → Front to see those objects in a familiar orientation. This camera two-step returns your view to a recognizable perspective.
About This Book
Not surprisingly, Google doesn’t provide a printed manual for a program it offers for free over the Internet. Instead, Google provides an online help system. It’s at http://sketchup.google.com/support, and you can read all about it in Appendix A. But with this book, you’ll get a full course in creating models in SketchUp, and you won’t need to jump back and forth between Google’s online help and your project.
This book serves as the kind of manual that should come with every program. You’ll find step-by-step instructions for using every feature in SketchUp, including those you may not even have understood, let alone mastered, such as the intricacies of, say, components or the Photo Match tools.
About the Outline
Google SketchUp: The Missing Manual is divided into six parts, each containing several chapters.
Part One: Basic SketchUp Skills introduces the SketchUp workspace and then lets you jump in and create your first model: a simple bench. With these new skills under your belt, you’re ready to explore in detail some of the differences between working in two dimensions and working in three dimensions. Step-by-step tutorials show you how to draw 2-D lines and shapes in SketchUp. By the end of Part 1, you’re drawing in three dimensions and using a wide variety of SketchUp tools to build increasingly detailed models.
Part Two: Building a House is where you become a journeyman builder. You start by building simple 3-D shapes and learn how to save them as reusable components. Along the way, you become an expert at adjusting the SketchUp view, so you can easily see and work with your model. At the end of this part, you use SketchUp’s Outliner to keep track of your components and to show and hide parts of your model as you work.
Part Three: Advanced Construction Techniques tackles more complicated construction projects like buildings with hipped roofs. You learn even more about the power of components and how to save tons of time by using them. You’re introduced to another timesaving tool, the Follow Me tool, which can build a complicated edge as fast as you can click.
Part Four: Adding Realism and Movement explores the ways you can place your models into the virtual world provided by scenes and Google Earth. What better way to show the beauty of your finely constructed 3-D building than with a walk-through? You’ll also learn how to dress up your models with realistic material shading and shadows. Most likely, your building has a place in the real world. You can find that spot in Google Earth and plop your model down where it belongs.
Part Five: Saving, Printing, and Sharing Projects is where you learn how to show off all your hard work and, if you wish, use the advanced tools in SketchUp Pro. You’ll find out about importing and exporting to a variety of file formats. You’ll learn about the Style Builder program that lets you customize the line styles used by SketchUp. This section also introduces SketchUp Pro’s LayOut tool, used to place your SketchUp models into documents for presentation to clients.
Part Six: Appendixes. Appendix A, Installing SketchUp and Getting Help, explains how to download and install SketchUp. You also learn where to look for additional help from sources such as Google and SketchUp user groups and forums. Appendix B, SketchUp Menu by Menu, provides a menu-by-menu description of the commands you find in SketchUp.
The Very Basics
You’ll find very little jargon or nerd terminology in this book. You will, however, see a few terms and concepts that you’ll encounter frequently in your computing life:
Clicking. This book gives you several kinds of instructions that require you to use your computer’s mouse or trackpad. To click means to point the arrow cursor at something on the screen and then—without moving the cursor at all—to press and release the clicker button on the mouse (or laptop trackpad). To double-click, of course, means to click twice in rapid succession, again without moving the cursor at all. To drag means to move the cursor while pressing the button continuously. To right-click or right-drag, do the same as above, but press the mouse button on the right.
When you see an instruction like Shift-click or Ctrl-click, simply press the key as you click.
Keyboard shortcuts. Sometimes, when you’re flush with design enthusiasm, you want to work as efficiently as possible. Many experienced SketchUp artists work with one hand on the mouse for drawing and the other hand on the keyboard, where they type shortcut keys to change views and swap tools. You’ll see your fair share of keyboard shortcuts in this book, usually in parentheses next to a tool’s name or command. Ctrl+C (⌘-C on the Mac), for example, is a keyboard shortcut for Copy in SketchUp and most other programs.
When you see a shortcut like Ctrl+S (⌘-S on the Mac), which saves changes to the current document, it’s telling you to hold down the Ctrl or ⌘ key, and, while it’s down, type the letter S, and then release both keys.
Choice is good. SketchUp frequently gives you several ways to trigger a particular command—by choosing a menu command, or by clicking a toolbar button, or by pressing a key combination, for example. Some people prefer the speed of keyboard shortcuts; others like the satisfaction of a visual command array available in menus or toolbars. This book lists all of the alternatives, but by no means are you expected to memorize all of them.
Macintosh and Windows
SketchUp works much the same way in its Mac and Windows incarnations, except for a few interface differences. This book’s illustrations give Mac and Windows equal time, alternating by chapter, so you get to see how all of SketchUp’s features look, no matter what kind of computer you’re running.
One small difference between Mac and Windows software that you need to be aware of is keystrokes. The Ctrl key in Windows is the equivalent of the Macintosh ⌘ key, and the key labeled Alt on a PC (and on non-U.S. Macs) is the equivalent of the Option key on American Mac keyboards.
Whenever this book refers to a key combination, therefore, you’ll see the Windows keystroke listed first (with + symbols, as is customary in Windows documentation); the Macintosh keystroke follows (with - symbols, in time-honored Mac tradition). In other words, you might read, “The keyboard shortcut for saving a file is Ctrl+S (⌘-S).” This book mentions any other significant differences between the Mac and Windows versions of SketchUp as they come up.
In SketchUp there are lots of single-letter shortcuts like R for the Rectangle tool and P for the Push/Pull tool. Most of the time these commands are the same on Windows and Mac. Often this book uses the common, single-letter command even when there’s an alternative command on the Mac.
About These Arrows
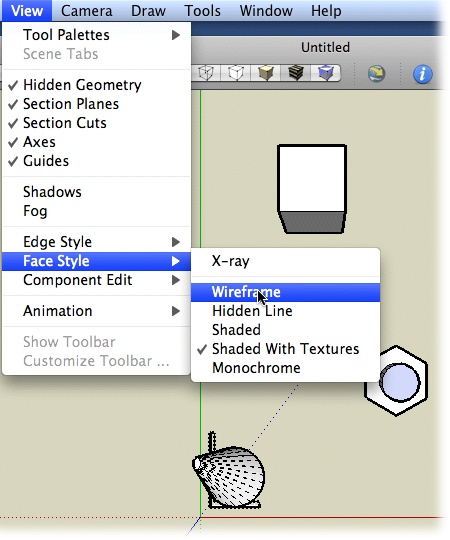
Throughout this book, you’ll find instructions like, “Open your Program Files → Google SketchUp → Templates folder.” That’s Missing Manual shorthand for much longer sentences like “Double-click your Program Files folder to open it. Inside, you’ll find a folder called Google SketchUp; double-click that folder to open it. Inside that folder is a folder called Templates; open it, too.” This arrow shorthand also simplifies the business of choosing menu commands, as you can see in Figure 4.
About MissingManuals.com
At http://missingmanuals.com, you’ll find articles, tips, and updates to Google SketchUp: The Missing Manual. In fact, we invite and encourage you to submit such corrections and updates yourself. In an effort to keep the book as up to date and accurate as possible, each time we print more copies of this book, we’ll make any confirmed corrections you’ve suggested. We’ll also note such changes on the website, so that you can mark important corrections into your own copy of the book, if you like. (Go to http://missingmanuals.com/feedback, choose the book’s name from the pop-up menu, and then click Go to see the changes.)
Also on our Feedback page, you can get expert answers to questions that come to you while reading this book, write a book review, and find groups for folks who share your interest in SketchUp.
While you’re there, sign up for our free monthly email newsletter. Click the “Sign Up for Our Newsletter” link in the left column. You’ll find out what’s happening in Missing Manual land, meet the authors and editors, see bonus video and book excerpts, and so on.
We’d love to hear your suggestions for new books in the Missing Manual line. There’s a place for that on missingmanuals.com, too. And while you’re online, you can also register this book at www.oreilly.com (you can jump directly to the registration page by going here: http://tinyurl.com/yo82k3). Registering means we can send you updates about this book, and you’ll be eligible for special offers like discounts on future editions of Google SketchUp: The Missing Manual.
SketchUp Examples
As you read the book’s chapters, you’ll encounter a number of step-by-step tutorials. You can work through the tutorials using your own SketchUp documents, or you can use the examples provided on this book’s Missing CD page. You can download them using any Web browser at http://.missingmanuals.com/cds. You’ll find raw materials (like half-finished 3-D models) and in some cases, completed models with which to compare your work.
Safari® Books Online
When you see a Safari® Books Online icon on the cover of your favorite technology book, that means the book is available online through the O’Reilly Network Safari Bookshelf.
Safari offers a solution that’s better than eBooks. It’s a virtual library that lets you easily search thousands of top tech books, cut and paste code samples, download chapters, and find quick answers when you need the most accurate, current information. Try it free at http://my.safaribooksonline.com.
Get Google SketchUp: The Missing Manual now with the O’Reilly learning platform.
O’Reilly members experience books, live events, courses curated by job role, and more from O’Reilly and nearly 200 top publishers.


