Up to now, most of the exercises have concentrated on edges and faces that are parallel and perpendicular to each other. Most of the edges and faces have been aligned with one of the three main axes: red, green, or blue. However, the world is filled with odd angles and sloped surfaces. And for good reason—a sloped surface is a great way to keep rainwater off your roof. In this section, you learn how to create sloped surfaces and how to reference an existing sloped surface to create a second sloped face at exactly the same angle.
Follow these steps to create a sloped roof for the first box you created in this chapter:
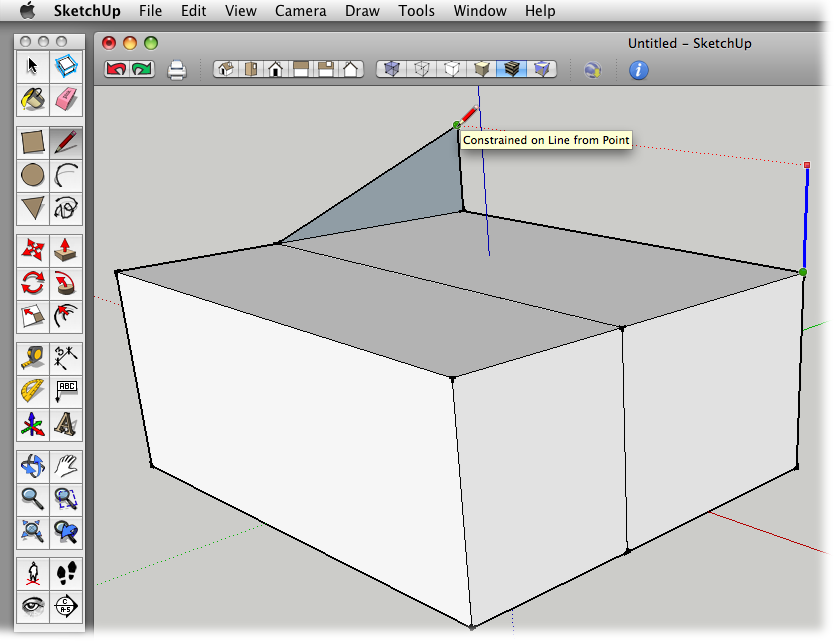
Click the corner that's farthest to the back, and then draw a short line along the blue axis.
A new line extends above the top of the boxes. SketchUp is ready for you to draw another line.
Draw a line down to the endpoint shared by the two boxes to create a triangular shape at the front of the box.
The angle of a sloped roof begins to take shape. Use Figure 4-5 as a reference for this second line.
Repeat steps 1 and 2 to create an identical triangle on the box's right side.
As you draw the vertical line along the blue axis, hold down the Shift key to lock the inference on the blue axis. Then move the cursor to the top of the first line as shown in Figure 4-5 to set the height for the new line.
Draw a ridgeline that connects the top point of each triangle.
Once the ridgeline is drawn, the back face and the sloped face fill in, creating the new roof.
The first box you drew now has a handsome sloped roof. Suppose you want to create a sloped roof for the second box that continues along the same angle. You can draw this line the hard way, the inaccurate way, or the easy way. The hard way is to pull out SketchUp's protractor tool (see Using the Protractor Tool) and to create a guideline that you use to create the new roofline. Well, that's not too hard, but it takes unnecessary steps and clicks. The inaccurate way is to change to a side view and just try to eyeball your roofline. You can get close, but it's unlikely you'll draw a truly accurate line. Creating your roofline the easy way takes only two clicks and a hover. Here are the steps:
Figure 4-5. Draw the second vertical line using the click-move-click method. Press and hold Shift to lock the line to the blue axis. Reference the top of the first line (as shown here) to set the height of the second line.
With the Line (L) tool, click the point where your two boxes meet at the top.
A rubber band line appears, attached to the end of the Line cursor on one end and to the corner point on the other.
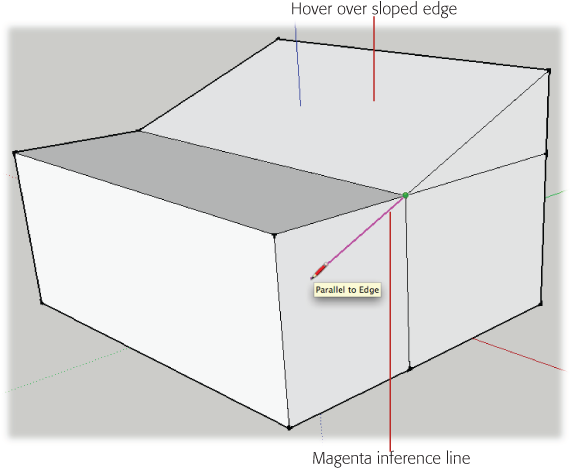
Move the cursor over the sloping line above the first box and hover along the edge.
Don't click or do anything else; you're just expressing your interest in the angled line. SketchUp takes note when you hover over an edge or face.
Move your cursor to extend that line across the vertical face of the second box, as shown in Figure 4-6.
When the line is at about the same slope as the roof line, it changes to a magenta color. This inference shows that the slope of the new line is identical to the line you hovered over in step 2. You can think of magenta as the parallel inference color.
Press and hold Shift to lock the inference.
The thin magenta line turns into a thick magenta line. You can move your line cursor anywhere in the window, and the line stays locked to the roof's slope. You lock the inference to the sloped line with the Shift key, just as you locked inferences that followed the main axes.
Click the box's right edge to finish the line.
Continue to hold Shift, and click any point along the right edge to complete the line.
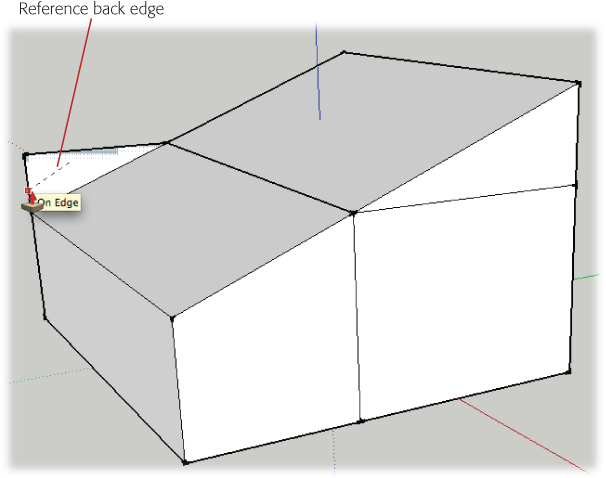
Use the Push/Pull tool to remove the portion of the box above the roofline, as shown in Figure 4-7.
Start by clicking the upper triangle, and then click on the back edge of the box to reference the back face. When you click the back face, the excess portion disappears as it's pushed out of existence.
It was easy to match the slope of the original roofline by using the magenta inference. You'd already drawn that second box, so it was simple to determine the endpoint for your new sloped roof. But what if you wanted to create a new 3-D shape by using that same slope? Perhaps you'd like to continue this roofline all the way to the ground. SketchUp gives you an easy way to figure out the dimensions of this new addition.
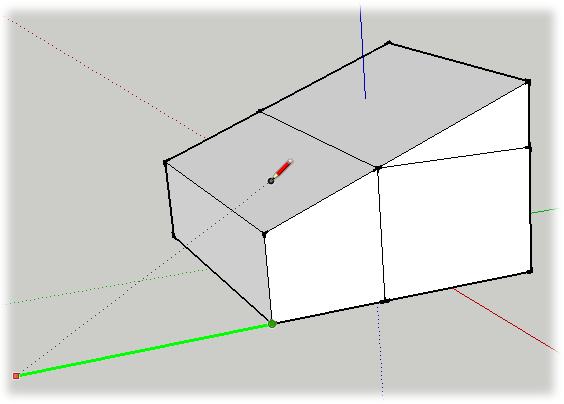
Click the house's bottom corner, and then drag a line along the green axis.
When the line is oriented to the green axis, its color changes from black to green.
Press and hold Shift to lock the green inference line.
Holding the Shift key locks the line to the green axis and changes it to a thick green line. Now you can move the Line cursor to any point in the drawing window without changing the line's orientation.
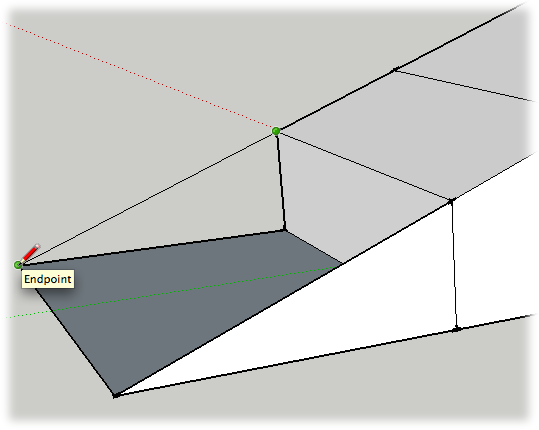
Move the Line tool to the surface of the roof and then click.
Make sure your cursor is over the face of the sloped roof (as shown in Figure 4-8). When you click, SketchUp creates a line that's the perfect length to extend the slope of the roof to the ground.
Click the corner of the roofline to complete the new triangle.
If you want to examine the new triangle you created, use the Orbit (O) tool. Inspection shows that it's a perfect extension of the other rooflines.
Draw a line along the red axis, using the back of the box as a reference point.
Use Shift to lock this new line to the red axis, and then click the house's back edge to determine its length.
Draw a line to connect to the bottom of the box.
SketchUp is ready to draw a new line, so all you have to do is click the corner.
Draw a sloping line to complete the back triangle and enclose the new 3-D shape.
When you draw the last line (Figure 4-9), the top face forming the roof fills in, and the new addition is complete.
By now you're probably confident that as long as you have a sloped edge or face to reference, you can create a matching slope for any circumstance. That's true, but for the sake of complete disclosure, here's one more example. If you're following along doing the examples in SketchUp, use the Eraser tool to remove the addition you built in the last example. (For a tip on erasing several edges at once, see the box on the next page.)
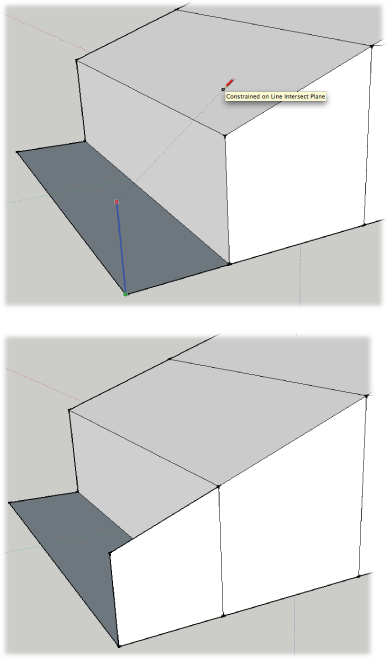
In the previous example, you saw how to extend a line to just the right length to continue the slope of the roof. You can also use an inference to create a vertical line that's just the right height to continue the roof. As shown in Figure 4-10, the method is almost exactly the same. Click to start drawing a vertical line. When the line is blue, indicating it's aligned with the blue axis, press and hold Shift to lock in the inference. Then you can move your cursor to reference any point, edge, or face in your model. Move the cursor over the face of the sloped roof and then click; SketchUp references the slope of the roof and creates a vertical line of exactly the right height. Finish up by drawing an edge that connects the top points.
Figure 4-10. Top: To create a vertical line that's exactly the right height to continue the roofline, press and hold Shift to lock the inference for the blue axis. Then click the face of the roof to reference the slope. Bottom: After you draw the vertical, connect the top points for a perfect continuation of the roofline.
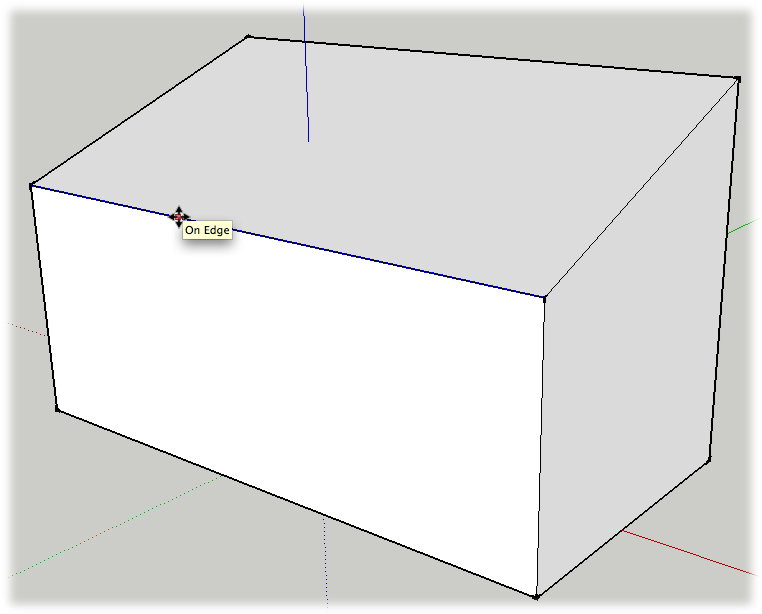
Inference locking works with all of the drawing tools, including those that draw lines and shapes. It also works with the tools that modify existing objects, such as the Move tool. To get a feeling for inference locking with the Move tool, start with a box like the one in Figure 4-11. Make sure the box has only six faces. If you're using a model from the previous exercise, remove any extra shared edges.
Figure 4-11. This box has a sloped roof. Using the Move tool and inference locking, you can even the sides.
With the Move (M) tool, click the top edge of the short side of the box.
The entire edge is highlighted, and the edge moves as you move the cursor.
Move the edge up, along the blue axis.
When the edge is moving along the blue axis, you see a blue dotted line and a tooltip that says "On Blue Axis".
Press and hold Shift to lock the movement along the blue axis.
When you press and hold Shift, the dotted line becomes thicker, and movement is constrained to the blue axis. You can move the cursor to any point in the drawing area, and the edge continues to move along the blue axis.
Move the cursor to the opposite edge, and click to reference the height of the opposite wall.
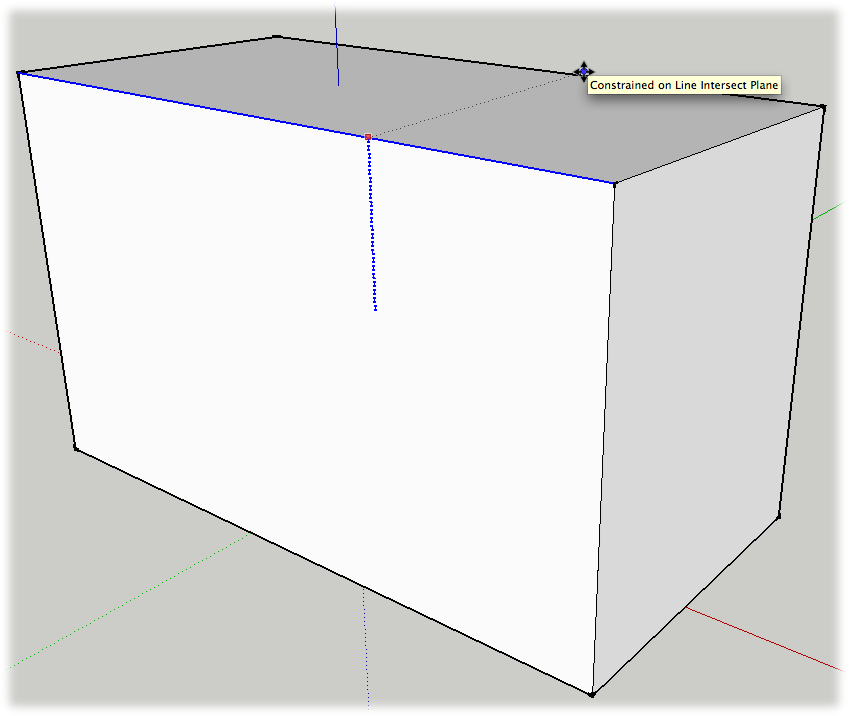
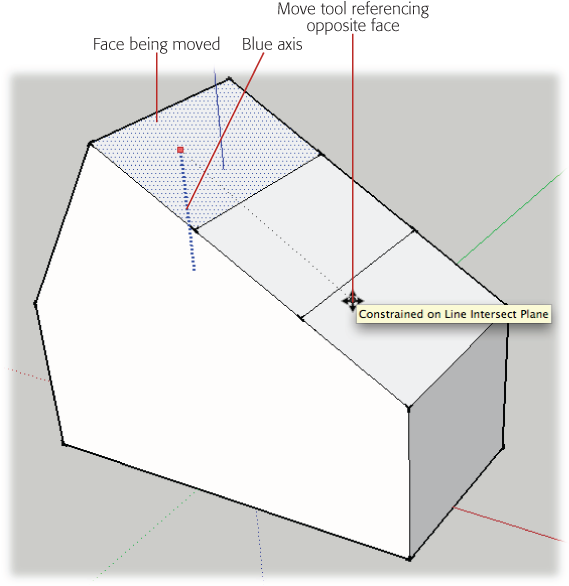
When your Move cursor is over the opposite edge of the box, a tooltip appears saying "Constrained on Line Intersect Plane", as shown in Figure 4-12. This message is SketchUp's cryptic way of telling you that you're referencing the height of the opposite edge.
Figure 4-12. You can use the Shift-key inference locking technique with many of SketchUp's tools. Here the Move tool is moving a top edge while it's locked into the blue axis. The opposite face of the box is referenced to create walls (faces) of equal height.
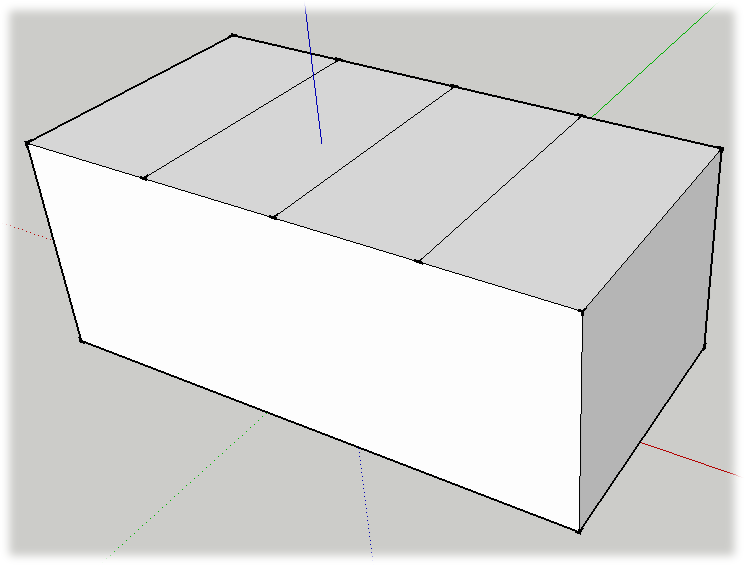
If you want to experiment some more using the Move tool, try this exercise. You can use the box from the previous exercise, or create a new box similar to the one in Figure 4-13. Find the midpoint along one of the long edges, and draw a line from midpoint to midpoint, dividing the top of the box into two halves. Doing that divides the long edges into two parts, where each part has its own midpoint. Divide the two parts again, so that the top of your box looks like Figure 4-13.
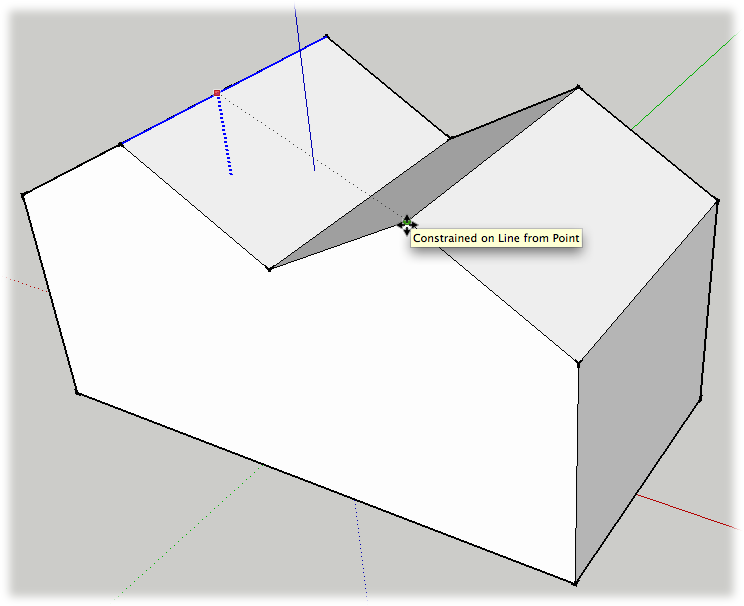
Use the Move (M) tool to pull up one of the lines to create a peaked roofline. When the movement is along the blue axis, you see a blue dotted line and a tooltip message that says "On Blue Axis". Press and hold Shift to lock the movement to that axis. Click to complete the movement and the reshaping of the roofline. Next click one of the other lines in the roof, as shown in Figure 4-14. Pull it up in the same manner, locking it to the blue axis. Then move your cursor over to the first ridgeline and click. This creates two roof ridges of exactly the same height.
Figure 4-13. The top of this box was divided into four parts. First, it was divided in half by drawing a line from midpoint to midpoint. Then each new section was divided in the same manner, from midpoint to midpoint.
Figure 4-14. As you pull the second roof ridge along the blue axis, hold down the Shift key to lock in the inference. Then reference the first ridge line to set the height of the edge.
You can use inference locking as you move an entire face and all its edges. For example, click one of the middle roof faces. Begin to move the face along the blue axis, and lock the inference by holding Shift. Once the inference is locked, reference the opposite sloping face, as shown in Figure 4-15. Click the face, and you create a tall roof with a single, off-center ridgeline.
If you've followed all the exercises in this chapter, you're probably a pro at locking inferences and referencing points, edges, and faces in your model. All that practice will come in handy as you work in SketchUp. This last example shows you how you can use references from one object, such as a house, to align shapes and faces that are completely unattached to that object. Again, this power comes from a combination of inference locking and SketchUp's click-move-click drawing method.
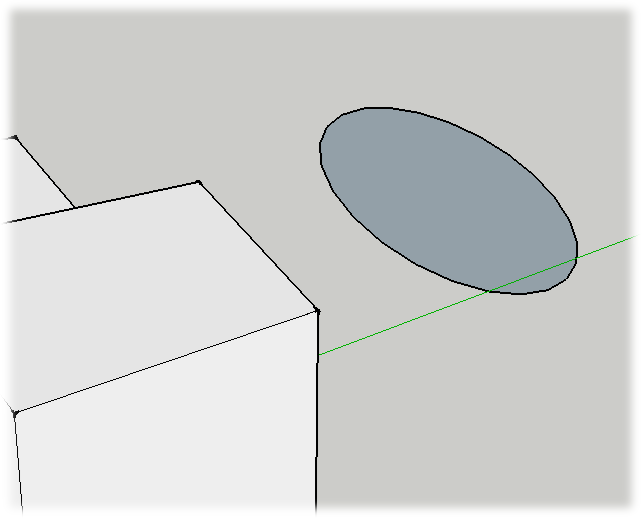
Start with a model that has a couple of sloped surfaces, like the house model from the previous exercises. Select one of the shape tools, like the Circle or Polygon tool. Notice that when you hold the shape tool over one of the surfaces of the house, the tool automatically orients itself to the surface underneath. Move to a different surface, and the tool snaps to that orientation. Move the tool to one of the sloped roof surfaces, and then press and hold Shift. Move the tool away from that surface, and then click-move-click to draw the shape in mid-air, away from the house model. When you're done, it should look something like Figure 4-16. The shape should be oriented to the same slope as the roof. Use the Orbit (O) tool to maneuver around and see the shape from different angles. If you want some more practice, draw shapes with the Rectangle and Polygon tools that are aligned to some of the other surfaces of the house.
Get Google SketchUp: The Missing Manual now with the O’Reilly learning platform.
O’Reilly members experience books, live events, courses curated by job role, and more from O’Reilly and nearly 200 top publishers.
