Fitting the bench seat on top of the leg assembly takes a couple of steps to get everything positioned precisely. The width of the bench legs and the seat is the same, 12 inches, so the components fit snugly front and back without any overhang. The first step is to place the bench seat on top of the leg assembly and to make sure the 12-inch bench seat is centered properly over the 12-inch legs.
The bench seat is longer than the leg assembly, so the sides of the bench seat hang cantilevered over the leg assembly. So the second step is to center the bench seat over the leg assembly lengthwise. To do this, you use one of SketchUp's handiest tricks, known as an inference. An inference is SketchUp's way of helping you find a particular point. It may show up as a dotted line or a colored point on an edge. The following steps also illustrate why it's best to use the click-move-click method instead of dragging.
Note
If you hid the bench seat while working through the previous section, reveal it again now. Open the Outliner (Window → Outliner), right-click Bench Seat, and then choose Unhide from the shortcut menu.
Use the Move (M) tool to position the bench seat so it's close to the leg assembly.
To accurately position objects, it's sometimes necessary to move the objects, change your camera position, and then move the objects again.
Use the Orbit (O), Pan (H), and Zoom (Z) tools to get a good view of the bench seat and the top of one of the legs.
Be patient and find the camera view that makes the job easier.
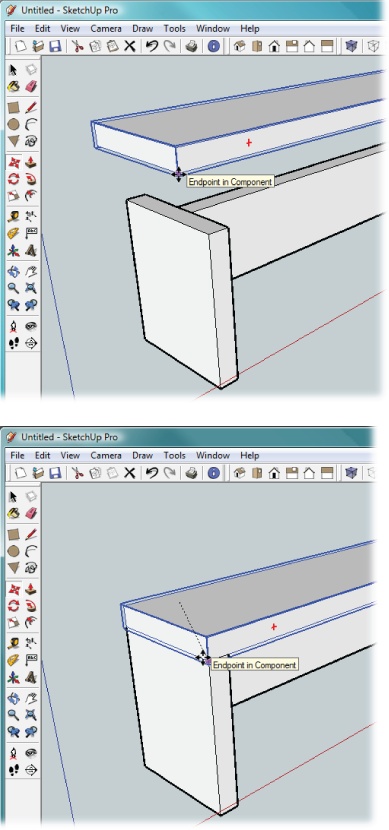
Use the Move (M) tool to move the lower-right corner of the bench seat to the upper-right corner of the leg, as shown in Figure 1-28.
When the two endpoints (corners) are close, the bench seat snaps into position.
Change to the Front view (Camera → Standard Views → Front).
Using the Front view makes it easier to move the bench seat along the red axis (left to right) without inadvertently changing its position on the green axis (front to back).
Figure 1-28. Move the corner (or "endpoint" in SketchUp-speak) of the bench seat to the corner of one the legs, and you line up the seat along two axes: the height (blue axis) and the depth (green axis). The last step (not shown here) is to center the bench seat over the legs by moving it in the direction of the red axis.
Use the Move (M) tool and select the bench seat's midpoint.
It doesn't matter if you choose the midpoint on the top edge or the bottom edge of the seat, because in the next step, you'll restrict the movement of the seat to movement along the red axis.
Slowly start to drag the bench seat to the left and then pause.
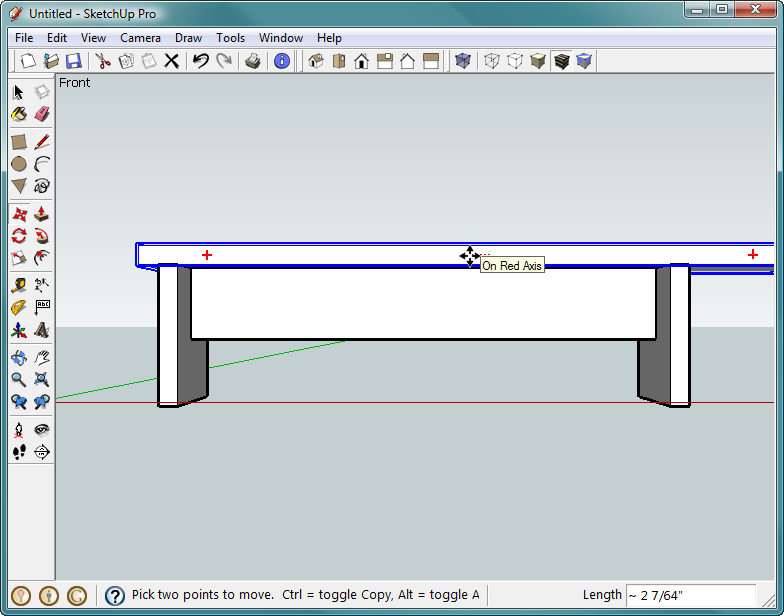
When you pause, a tooltip appears reading, "On Red Axis". If you don't see this tooltip, you may be moving the bench seat off the red axis. Press Esc (or Undo if you've completed the move), and try again with a steady hand.
When you see the "On Red Axis" tooltip, as shown in Figure 1-29, press Shift.
Pressing Shift restricts the movement to the red axis, keeping it aligned properly over the bench legs. You see a red dotted line that signals the movement is restricted to the red axis. As long as you press Shift, you restrict the bench seat's movement, and you can't move the bench seat up or down (blue axis) or back into your drawing area (green axis).
Move the cursor down to find the support's midpoint.
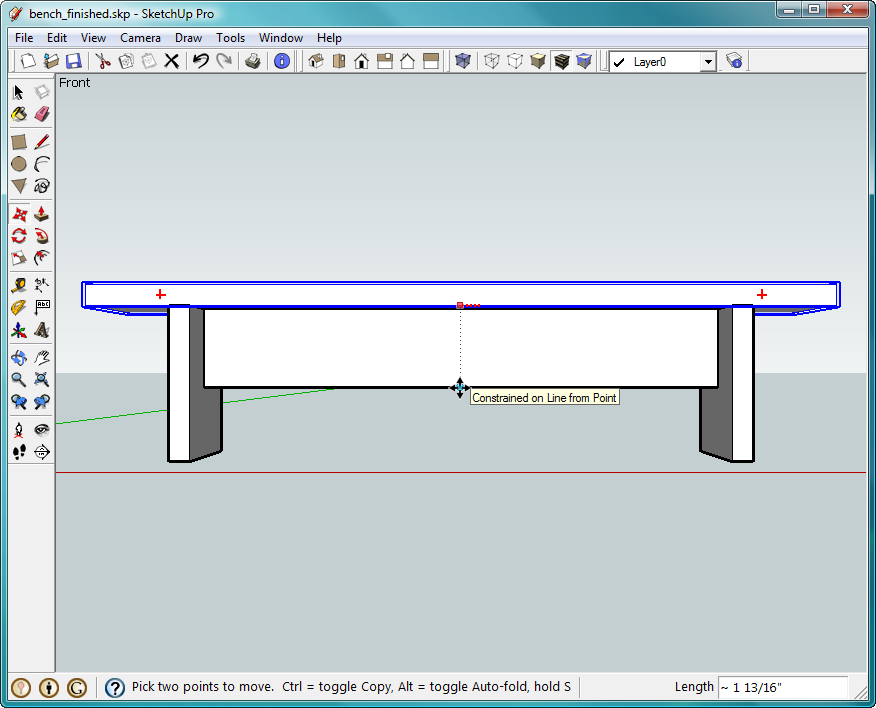
With the bench seat's movement restricted, you can move your cursor away from the bench seat without dragging the seat off track. The bench seat moves in a level trajectory as you move the mouse cursor to find the midpoint of the support. All you need to do now is line up the center of the bench seat with the center of the leg assembly. You'll feel that familiar "snap to" action and see a tooltip that reads "Constrained on Line from Point", as shown in Figure 1-30.
When you find the support's midpoint, click to place the seat.
At this point the bench seat is perfectly centered over the Leg Assembly.
Use the Orbit (O) tool to check the bench from different angles.
Check to make sure it fits and is centered properly. If necessary, make adjustments by realigning the midpoints.
Ctrl-click (Option-click) to select both the bench seat and the leg assembly, and then press G to create a new component named Bench.
As always, give your Bench component a name and description. You can create new instances of your bench by dragging them from the Components window.
Get Google SketchUp: The Missing Manual now with the O’Reilly learning platform.
O’Reilly members experience books, live events, courses curated by job role, and more from O’Reilly and nearly 200 top publishers.


