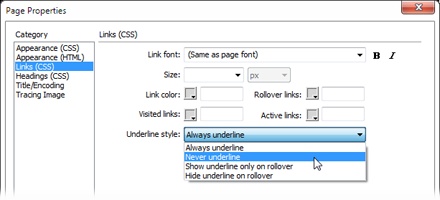
You can control the basic look of links from the Links category of the Page Properties window (Figure 4-11). To open it, choose Modify→Page Properties→Links (CSS), press Ctrl+J (⌘-J)→Links (CSS), or click the Page Properties button in the Property Inspector (the button appears only when you have either nothing on the page selected or you have text selected; it doesn’t appear if you have an image selected, for example). In the Category list, click “Links (CSS).”
Figure 4-11. The Page Properties’ Links (CSS) window lets you set basic properties for the links on a page, including their font, color, and size. This window is mainly a shortcut for creating CSS styles.
The top set of options—font, size, bold, italic—sets the basic formatting for every link on the page. The next group of options sets the color of the links under specific conditions. Web browsers keep track of how a visitor interacts with the links on a page: when he moves his mouse over a link, for example. Each link has four modes (called states): a plain, unvisited link is simply called a link; a link that a visitor has already clicked (determined by your guest’s browser history) is called a visited link; a link that a guest’s mouse is currently pointing to is technically called a hover state, though Dreamweaver refers to it as a rollover link; and a link in the process of being clicked (where a visitor has pressed but not released his mouse button) is known as an active link.
Each of these states provides useful feedback for your visitors, and you can style each one individually. In most web browsers, a plain link appears blue until you visit the linked page—then the link turns purple. This helpful color-coding lets a visitor know whether to follow a link: “Hey, there’s a page I haven’t seen,” or, “Been there, done that.”
The rollover (or hover) link is particularly useful in telling visitors they can click the link, and it lends itself to a lot of creative potential. For example, you can completely change the look of a link when a visitor mouses over it; you can change its color, add a background image, or change its background color. (To get neat effects like this, you need to go beyond the Page Properties window and set styles for your links, as described in the next section.)
Finally, an active link is for that fleeting moment when a visitor clicks a link but has yet to release the mouse button. It happens so fast that it’s usually not worth spending too much time formatting the state.
Note
Internet Explorer applies the active link style to any link a visitor tabs to (some web surfers can’t, or don’t want to, use a mouse and rely on the keyboard to navigate websites). Firefox, Safari, Opera, and Chrome use yet another link state, called focus, to style links that someone reaches via the Tab key. See the note on Note for more on a link’s focus state.
The Page Properties window lets you change the color for each link state. In addition, the “Underline style” menu lets you control whether a browser underlines a link (the default), displays nothing beneath the link, displays an underline when a guest mouses over the link, or underlines the link by default but removes it once a visitor mouses over it. Since web surfers are accustomed to thinking of underlined text as a big “CLICK ME” sign, think twice before removing underlines from links. Without some clear indication that the text is a link, visitors may never see (or click) the links on your page.
One problem with using the Page Properties window to style links is that the settings apply only to the current page. That’s because the Page Properties window saves the CSS styles to an internal style sheet in the current page. Fortunately, you don’t need to set the Page Properties on every page of your site; you can move the styles you create in Page Properties to an external style sheet (see Internal vs. External Style Sheets for a refresher on external style sheets). If you use the Page Properties window for one page, you can export those styles or even drag them into an external style sheet. (To learn how, see Moving and Managing Styles.) Alternatively, you can bypass the Page Properties window altogether and create CSS link styles from scratch—which you’ll learn about in the next section.
Using the CSS Styles panel to create styles for your links gives you access to many more formatting options besides the font, color, and size options offered in the Page Properties window. In fact, you can apply nearly every CSS property to links. For example, you can use all the text options discussed on Aligning Text—font size, weight, variant, letter spacing, and so on—to format a link. In addition, you can add a border (Adding Borders) and a background color to a link to make it look like a button.
To format the look of all your links, create a tag style (Types of Styles) for the <a> tag (the tag that creates links) using the instructions on Creating Styles. To create a different look for a particular link (if you want that “Buy Now!” link to be bigger and bolder than other links on a page, for example), create a class style (Types of Styles) and apply it directly to that link.
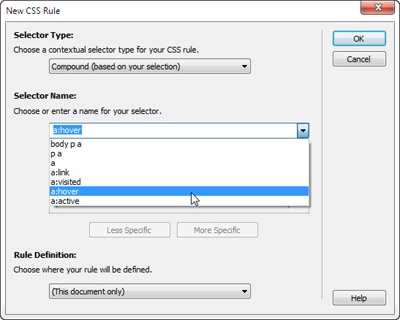
To control how a link looks for different states (link, visited, hover, and active), you need to dip a little deeper into the CSS pool and use what’s called a pseudo-class. As you’ve read, a selector is merely the part of a style that instructs a browser where to apply the style—h1 is the selector for formatting every Heading 1, for example. When you select Compound from the Selector Type menu at the top of New CSS Rule window, Dreamweaver lets you select one of four pseudo-classes, each of which refer to a different type of link, as shown in Figure 4-12. These four options (a:link, a:visited, a:hover, and a:active) correspond to the link states you saw in the Page Properties window.
Figure 4-12. The drop-down menu that appears when you select “Compound” as the selector type from the top menu lists the four link pseudo-classes. You may see one or more other names at the top of the list, too—for example, the “body p a,” “p a,” and “a” selector names you see in this menu. The Selector Name menu lists the style names you can apply to what you have selected on the page. In this case, you put the cursor inside a link, which was inside a paragraph. As a result, Dreamweaver suggests creating a “body p a” style or a “p a” style. These styles are called descendent selectors—you’ll learn about them on page 377.
To use a pseudo-class, open the New CSS Rule window (click the + icon in the CSS Styles panel or go to Format→CSS Styles→New), select Compound from the Selector Type menu, and then choose the appropriate selector from the Selector Name drop-down menu. For example, to format the way a link looks when a guest mouses over it, choose a:hover. You don’t have to set all four pseudo-classes; if you’re not interested in how your links look during the nanosecond that a visitor clicks it, skip the a:active option. If you want to set more than one pseudo-class, you must create them in the order that they appear in the menu, or the styles may not display as you intend them. (A helpful mnemonic for remembering this rule is LoVe HAte—that is, :link comes before :visited, which comes before :hover, which comes before :active.)
Note
Safari, Firefox, and Chrome browsers understand an additional pseudo-class related to links: a:focus. This selector applies when a visitor uses the Tab key to move from one link to another on a page. Each time she jumps to a new link, the browser highlights it and gives the link “focus.” All versions of IE treat a:active as if it were a:focus.
To create a style that formats a link when a visitor tabs to it (instead of mouses over it), create what’s called a group style. Here’s how: When you create the “highlighted” style, choose Compound for the selector type. For the selector name, type in a:focus, a:active. This applies the “tabbed to” highlight style for all current browsers.
Using these styles, you can make your link text appear red and underscored before a visitor clicks the link, twice as large when he mouses over it, purple and boldfaced when he clicks it, and pale pink after he visits the linked site. (Granted, if you try this design, Martha Stewart may never hire you to design her site, but you get the point.)
Note
For security reasons, current browsers limit the styling you apply to a visited link to just a different color. In other words, say you create the pseudo-class style a:visited and change the font, font-size, background-color, underline, and set its text color to red; the only visual change the browser will make to a visited link is to change its text color to red—the font, background-color, and other settings are simply ignored.
Note that these link pseudo-classes have one drawback: setting them affects all the links on a page. In that respect, adding pseudo-classes to the a tag (a:active, a:hover, and so on) is like creating tag styles.
Tip
Dreamweaver lets you quickly preview link states in Design view. Choose View→Toolbars→Style Rendering to open the Style Rendering toolbar sandwiched between the Related Files toolbar (Advanced Formatting Options) and the Document toolbar (The Document Window). Buttons labeled :l (for the link state), :v (for visited), :h (for hover), :a (for active) and :f (for focus) appear at the right side of the toolbar. Click any of them to see the CSS design for the selected state: for example, click the :h button to see all the links on a page as they’ll appear when a mouse hovers over them. You’ll learn more about the Style Rendering toolbar on Previewing Media Styles in Dreamweaver.
If you want to apply a style to only certain links on a page, here’s what to do: create a new style (click the + button in the CSS Styles panel, for example), choose Compound from the Selector Type menu in the New CSS Rule window, and then, in the Selector Name box, type a class name followed by a colon and the appropriate link state. For example, to change the look of a “Buy Now!” link only, you could create a style called .buyNow:link; to make that link look different when someone mouses over it, you’d name the link .buyNow:hover.
After naming the style (and saving it to an external style sheet), follow the steps on Phase 2: Defining a Style to create the look for that style (choose a font, select a color, and so on). After you create the style, simply apply the style class to the link (or links) you want to style using any of the techniques described on Using Styles. (In the example above, the class name is buyNow, and that’s what you’ll see listed in the Property Inspector’s Class menu.)
Note
Descendent selectors provide a more efficient—but more complex—way to format specific links differently from all the others on a page. You’ll find this CSS concept discussed on Descendent Selectors.
Get Dreamweaver CS6: The Missing Manual now with the O’Reilly learning platform.
O’Reilly members experience books, live events, courses curated by job role, and more from O’Reilly and nearly 200 top publishers.


