Adding and Removing Cells
Even after you insert a table into a web page, you can add and subtract rows and columns. The text or images in the columns move right or down to accommodate their new next-door neighbors.
Adding One Row or Column
To add a single row to a table, use any of these approaches:
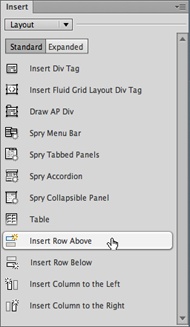
Click inside a cell. On the Insert panel’s Layout category, click the Insert Row Above button (see Figure 6-9) to add a row above the current row. Click the Insert Row Below button to add a row below the current row.
Click inside a cell. Choose Modify→Table→Insert Row, or press Ctrl+M (⌘-M) to insert a new row of cells above the current row. Alternatively, you can right-click (Control-click) a cell, and then, from the shortcut menu, choose Table→Insert Row.
To add a new row at the end of a table, click inside the last cell in the table, and then press Tab.

Figure 6-9. Four buttons in the Layout category of the Insert panel make it easy to add columns and rows. They also make it easy to control where a new row or column goes—a feat not possible with a simple keyboard shortcut.
The new rows inherit all the properties (except width) of the row you originally clicked.
To add a single column of cells:
Click inside a cell. On the Insert bar’s Layout tab, click the “Insert Column to the Left” button to add a column to the left of the selected one. Click the “Insert Column to the Right” button to add a ...
Get Dreamweaver CS6: The Missing Manual now with the O’Reilly learning platform.
O’Reilly members experience books, live events, courses curated by job role, and more from O’Reilly and nearly 200 top publishers.

