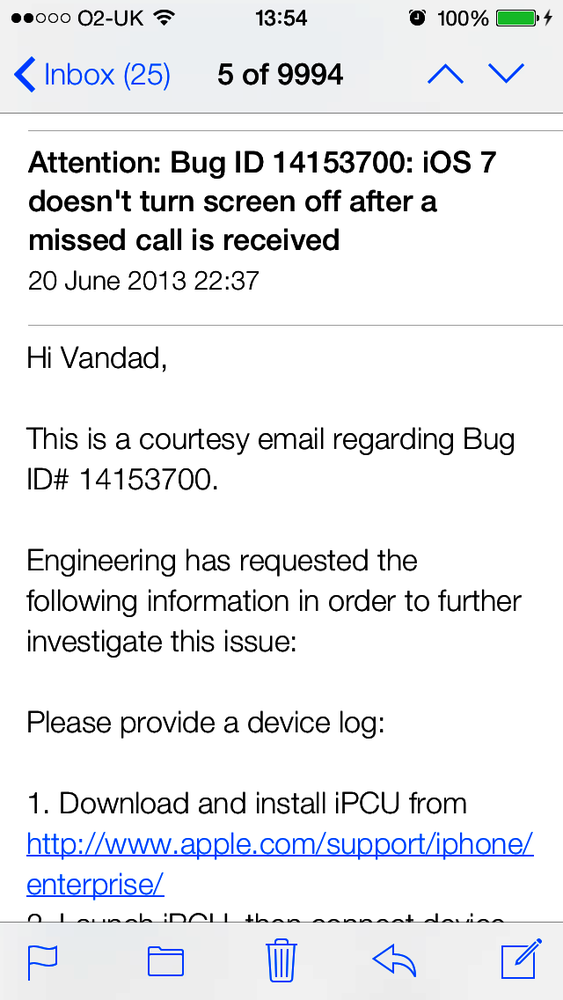
A navigation bar can contain different items. Buttons are often
displayed on the left and the right sides. These buttons are of class
UIBarButtonItem and can take many
different shapes and forms. Let’s have a look at an example in Figure 1-36.
Navigation bars are of class UINavigationBar and can be created at any time
and added to any view. Just look at all the different buttons with
different shapes that have been added to the navigation bar in Figure 1-36. The ones
on the top right have up and down arrows, and the one on the top left
has an arrow pointing to the left. We will have a look at creating some
of these buttons in this recipe.
Note
For this recipe, you must follow the instructions in Creating and Running Our First iOS App to create an empty application. Then follow the instructions in Recipe 1.12 to add a navigation controller to your app delegate.
In order to create a navigation button, we must do the following:
Create an instance of
UIBarButtonItem.Add that button to the navigation bar of a view controller using the view controller’s
navigationItemproperty. ThenavigationItemproperty allows us to interact with the navigation bar. This property has two others on itself:rightBarButtonItemandleftBarButtonItem. Both these properties are of typeUIBarButtonItem.
Let’s then have a look at an example where we add a button to the right side of our navigation bar. In this button, we will display the text “Add”:
-(void)performAdd:(id)paramSender{NSLog(@"Action method got called.");}-(void)viewDidLoad{[superviewDidLoad];self.title=@"First Controller";self.navigationItem.rightBarButtonItem=[[UIBarButtonItemalloc]initWithTitle:@"Add"style:UIBarButtonItemStylePlaintarget:selfaction:@selector(performAdd:)];}
When we run our app now, we will see something similar to Figure 1-37.
That was easy. But if you are an iOS user, you probably have noticed that the system apps that come preconfigured on iOS have a different Add button. Figure 1-38 shows an example in the Alarm section of the Clock app on the iPhone (notice the + button on the top right of the navigation bar).
It turns out that the iOS SDK allows us to create
system buttons on the navigation bar. We do that by
using the initWithBarButtonSystemItem:target:action:
initializer of the UIBarButtonItem
class:
-(void)performAdd:(id)paramSender{NSLog(@"Action method got called.");}-(void)viewDidLoad{[superviewDidLoad];self.title=@"First Controller";self.navigationItem.rightBarButtonItem=[[UIBarButtonItemalloc]initWithBarButtonSystemItem:UIBarButtonSystemItemAddtarget:selfaction:@selector(performAdd:)];}
And the results are exactly what we were looking for (Figure 1-39).
The first parameter of the initWithBarButtonSystemItem:target:action:
initializer method of the navigation button can have any of the values
listed in the UIBarButtonSystemItem
enumeration:
typedefNS_ENUM(NSInteger,UIBarButtonSystemItem){UIBarButtonSystemItemDone,UIBarButtonSystemItemCancel,UIBarButtonSystemItemEdit,UIBarButtonSystemItemSave,UIBarButtonSystemItemAdd,UIBarButtonSystemItemFlexibleSpace,UIBarButtonSystemItemFixedSpace,UIBarButtonSystemItemCompose,UIBarButtonSystemItemReply,UIBarButtonSystemItemAction,UIBarButtonSystemItemOrganize,UIBarButtonSystemItemBookmarks,UIBarButtonSystemItemSearch,UIBarButtonSystemItemRefresh,UIBarButtonSystemItemStop,UIBarButtonSystemItemCamera,UIBarButtonSystemItemTrash,UIBarButtonSystemItemPlay,UIBarButtonSystemItemPause,UIBarButtonSystemItemRewind,UIBarButtonSystemItemFastForward,#if __IPHONE_3_0 <= __IPHONE_OS_VERSION_MAX_ALLOWEDUIBarButtonSystemItemUndo,UIBarButtonSystemItemRedo,#endif#if __IPHONE_4_0 <= __IPHONE_OS_VERSION_MAX_ALLOWEDUIBarButtonSystemItemPageCurl,#endif};
One of the really great initializers of the UIBarButtonItem class is the initWithCustomView: method. As its parameter,
this method accepts any view. This means we can even add a UISwitch (see Recipe 1.2) as a button on
the navigation bar. This won’t look very good, but let’s give it a
try:
-(void)switchIsChanged:(UISwitch*)paramSender{if([paramSenderisOn]){NSLog(@"Switch is on.");}else{NSLog(@"Switch is off.");}}-(void)viewDidLoad{[superviewDidLoad];self.view.backgroundColor=[UIColorwhiteColor];self.title=@"First Controller";UISwitch*simpleSwitch=[[UISwitchalloc]init];simpleSwitch.on=YES;[simpleSwitchaddTarget:selfaction:@selector(switchIsChanged:)forControlEvents:UIControlEventValueChanged];self.navigationItem.rightBarButtonItem=[[UIBarButtonItemalloc]initWithCustomView:simpleSwitch];}
And Figure 1-40 shows the results.
You can create pretty amazing navigation bar buttons. Just take a look at what Apple has done with the up and down arrows on the top-right corner of Figure 1-36. Let’s do the same thing, shall we? Well, it looks like the button actually contains a segmented control (see Recipe 1.8). So we should create a segmented control with two segments, add it to a navigation button, and finally place the navigation button on the navigation bar. Let’s get started:
-(void)segmentedControlTapped:(UISegmentedControl*)paramSender{switch(paramSender.selectedSegmentIndex){case0:{NSLog(@"Up");break;}case1:{NSLog(@"Down");break;}}}-(void)viewDidLoad{[superviewDidLoad];self.title=@"First Controller";NSArray*items=@[@"Up",@"Down"];UISegmentedControl*segmentedControl=[[UISegmentedControlalloc]initWithItems:items];segmentedControl.momentary=YES;[segmentedControladdTarget:selfaction:@selector(segmentedControlTapped:)forControlEvents:UIControlEventValueChanged];self.navigationItem.rightBarButtonItem=[[UIBarButtonItemalloc]initWithCustomView:segmentedControl];}
And Figure 1-41 shows what the output looks like.
The navigationItem of
every view controller also has two very interesting methods:
setRightBarButtonItem:animated:Sets the navigation bar’s right button.
setLeftBarButtonItem:animated:Sets the navigation bar’s left button.
Both methods allow you to specify whether you want the placement
to be animated. Pass the value of YES
to the animated parameter if you want
the placement to be animated. Here is an example:
UIBarButtonItem*rightBarButton=[[UIBarButtonItemalloc]initWithCustomView:segmentedControl];[self.navigationItemsetRightBarButtonItem:rightBarButtonanimated:YES];
Get iOS 7 Programming Cookbook now with the O’Reilly learning platform.
O’Reilly members experience books, live events, courses curated by job role, and more from O’Reilly and nearly 200 top publishers.


