You want to grab users’ attention in a table view by displaying accessories and offer different ways to interact with each cell in your table view.
Use the accessoryType of
the UITableViewCell class, instances
of which you provide to your table view in its data source
object:
-(UITableViewCell*)tableView:(UITableView*)tableViewcellForRowAtIndexPath:(NSIndexPath*)indexPath{UITableViewCell*result=nil;if([tableViewisEqual:self.myTableView]){result=[tableViewdequeueReusableCellWithIdentifier:MyCellIdentifierforIndexPath:indexPath];result.textLabel.text=[NSStringstringWithFormat:@"Section %ld, Cell %ld",(long)indexPath.section,(long)indexPath.row];result.accessoryType=UITableViewCellAccessoryDetailDisclosureButton;}returnresult;}-(NSInteger)tableView:(UITableView*)tableViewnumberOfRowsInSection:(NSInteger)section{return10;}-(void)viewDidLoad{[superviewDidLoad];self.myTableView=[[UITableViewalloc]initWithFrame:self.view.boundsstyle:UITableViewStylePlain];[self.myTableViewregisterClass:[UITableViewCellclass]forCellReuseIdentifier:MyCellIdentifier];self.myTableView.dataSource=self;self.myTableView.autoresizingMask=UIViewAutoresizingFlexibleWidth|UIViewAutoresizingFlexibleHeight;[self.viewaddSubview:self.myTableView];}
You can assign any of the values defined in the UITableViewCellAccessoryType enumeration to
the accessoryType property of an
instance of the UITableViewCell
class. Two very useful accessories are the disclosure
indicator and the detail disclosure
button. They both display a chevron indicating to users that
if they tap on the associated table view cell, a new view or view
controller will be displayed. In other words, the users will be taken to
a new screen with further information about their current selector. The
difference between these two accessories is that the disclosure
indicator produces no event, whereas the detail disclosure button fires
an event to the delegate when pressed. In other words, pressing the
button has a different effect from pressing the cell itself. Thus, the
detail disclosure button allows the user to perform two separate but
related actions on the same row.
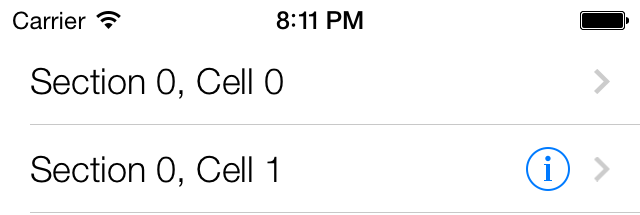
Figure 4-3 shows these two different accessories on a table view. The first row has a disclosure indicator, and the second row has a detail disclosure button.
If you tap any detail disclosure button assigned to a table view cell, you will immediately realize that it truly is a separate button. Now the question is: how does the table view know when the user taps this button?
Table views, as explained before, fire events on their delegate object. The detail disclosure button on a table view cell also fires an event that can be captured by the delegate object of a table view:
-(void)tableView:(UITableView*)tableViewaccessoryButtonTappedForRowWithIndexPath:(NSIndexPath*)indexPath{/* Do something when the accessory button is tapped */NSLog(@"Accessory button is tapped for cell at index path = %@",indexPath);UITableViewCell*ownerCell=[tableViewcellForRowAtIndexPath:indexPath];NSLog(@"Cell Title = %@",ownerCell.textLabel.text);}
This code finds the table view cell whose detail disclosure button has been tapped and prints the contents of the text label of that cell into the console screen. As a reminder, you can display the console screen in Xcode by selecting Run → Console.
Get iOS 7 Programming Cookbook now with the O’Reilly learning platform.
O’Reilly members experience books, live events, courses curated by job role, and more from O’Reilly and nearly 200 top publishers.


