File Sharing
When you’re done wiring (or not wiring, as the case may be), your network is ready. Your Mac should “see” any Ethernet or shared USB printers, in readiness to print (see Chapter 13). You can now play network games or use a network calendar. And you can now turn on File Sharing, one of the most useful features of the Mac OS.
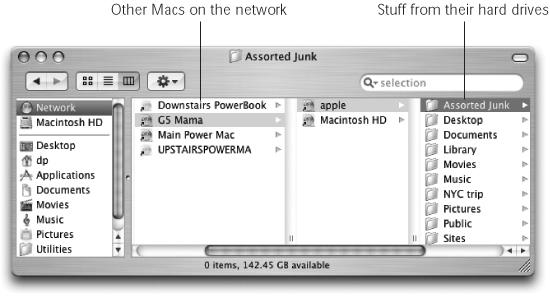
In File Sharing, you can summon the icon for a folder or disk attached to another computer on the network, whether it’s a Mac or a Windows PC. It shows up in a Finder window, as shown in Figure 12-3. At this point, you can drag files back and forth, exactly as though the other computer’s folder or disk is a hard drive connected to your own machine.
Setting up the Computers
These instructions assume that you’ve already set up your network, as described at the beginning of this chapter.

Figure 12-3. The point of file sharing is to bring other Macs and PCs onto your own screen—in this example, the contents of the account called apple on the Mac called G5 Mama. By dragging icons back and forth, you can transfer your work from your main Mac to your laptop; give copies of your documents to other people; create a “drop box” that collects submissions; and so on.
Setting up a Mac OS X machine
The first step in setting up file sharing is to create an account for each person who might want to visit (Chapter 11). Whatever password you use to log in to the Mac ...
Get Mac OS X: The Missing Manual, Panther Edition now with the O’Reilly learning platform.
O’Reilly members experience books, live events, courses curated by job role, and more from O’Reilly and nearly 200 top publishers.

