May 2000
Intermediate to advanced
620 pages
18h 2m
English
Your PalmPilot may be no bigger than a pocket calculator, but it’s infinitely more flexible. Read this section with palmtop in hand; in the process, you’ll not only get a gentle tour of the interface, but also tailor its operation to your own working style.
The very first time you turn on your palmtop, or after having reset it (see Chapter 17), you’re walked through a series of setup steps. On recent models, such as the Palm IIIx, Palm V, and Palm VII, this series of startup screens forms a miniature crash course in using the device. One screen offers instructions for setting up HotSyncing; another gives you a miniature Graffiti handwriting-recognition tutorial.
No matter which model you have, however, an important part of the startup sequence is aligning the digitizer. That’s when you’re asked to tap three specific spots on your reading, one at a time, as shown in Figure 2.1.
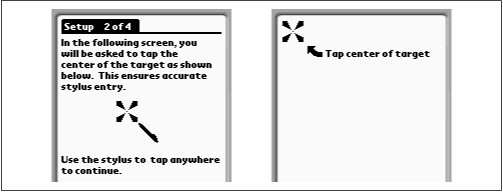
Figure 2-1. To ensure that your stylus tip is aligned correctly with the touch screen, carefully tap in the center of the targets the PalmPilot offers you.
The screen is actually two superimposed layers: the one you can see, which displays text and graphics, and the clear, pressure-sensitive overlay, which detects your taps and other stylus activity. Because of possible variations on the angle at which you hold the device, ...
Read now
Unlock full access


