Name
Insert → Break
Synopsis
When typing a document that runs over the length of a page, Word inserts a page break and typing automatically continues on the next page. These breaks are referred to as automatic breaks , and cannot be changed or deleted.
In Normal view, page and section breaks show onscreen at all times as dashed horizontal lines. In Print Layout view, page breaks appear as physical splits in the paper, and no break codes appear. To see breaks onscreen in Print Layout view, use the Show/Hide button on the Standard toolbar. Working in Show/Hide mode also makes it easy to delete a page break by selecting the break and pressing Delete.
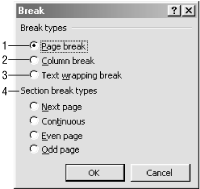
Forced breaks are manually inserted into a document to control where Word breaks a page, column, or text wrapping. Insert a forced break using the Insert → Break command, which opens the Break dialog box (Figure 7-1).
Double-Click the Section Break Line
Double-click a section break line to quickly open the File → Page Setup → Layout dialog.
The following list describes the Break dialog options:

Figure 7-1. Inserting a forced break
Page break . This is the default selection in the dialog box and forces the beginning of a new page. Pressing Ctrl-Enter while in the main document also inserts a page break.
Column break . This break forces text in a newspaper-style column to stop and continue in the next consecutive column, leaving white ...
Get Word 2000 in a Nutshell now with the O’Reilly learning platform.
O’Reilly members experience books, live events, courses curated by job role, and more from O’Reilly and nearly 200 top publishers.

